Linux App Needs NFS Storage? Configure NFS for Blob Storage
CloudTrips has a Linux application that expects a shared directory rather than an object-storage API. Azure Blob Storage supports NFS 3.0, allowing Linux to mount a blob container as a directory while Azure stores its files as block blobs.
This is NFS for Blob Storage, not an Azure Files NFS share. Both appear as a mounted directory to Linux, but the underlying services and intended workloads are different:
| NFS for Blob Storage | Azure Files NFS share |
|---|---|
| Stores each file as a block blob in a blob container | Stores files in a managed file share |
Uses NFS 3.0 and the Blob endpoint: account.blob.core.windows.net |
Uses NFS 4.1 and the File endpoint: account.file.core.windows.net |
| Optimized for object-storage scale and large, sequential, read-heavy workloads | Intended for applications that primarily need a conventional shared file system |
| Data remains accessible through Blob Storage APIs and object-storage tools | Data is managed through Azure Files |
| Has more file-system limitations, including no NLM file-locking service | Provides broader file-system semantics and protocol features |
Choose Blob NFS when the application needs NFS access to data that should remain in object storage—for example analytics, media processing, or HPC datasets. Choose Azure Files NFS when the main requirement is a conventional shared file system. Applications that require full POSIX behavior, frequent in-place overwrites, or file locking must be checked carefully before using Blob NFS.
Create the Network
Create a standalone resource group:
Subscription: CloudTrips TEST
Resource group: rg-cloudtrips-nfs-test-itn
Region: Italy North
Search for Virtual networks, select Create, and use:
Virtual network: vnet-cloudtrips-nfs-test-itn
Address space: 10.70.0.0/16
Subnet name: snet-app
Subnet range: 10.70.1.0/24
The network is the security boundary for NFS access. Blob NFS requests are not authorized with storage account keys, SAS tokens, Microsoft Entra roles, or ACLs.
Create the Linux Client
Create an Ubuntu VM in the same resource group:
Virtual machine name: vm-cloudtrips-nfs01-test-itn
Region: Italy North
Image: Ubuntu Server 24.04 LTS
Size: Standard D2s v3
Authentication type: SSH public key
Virtual network: vnet-cloudtrips-nfs-test-itn
Subnet: snet-app
Public inbound ports: Allow selected ports
Select inbound ports: SSH (22)
Create the VM and keep its public IP address for the later SSH connection.
Create the NFS Storage Account
Search for Storage accounts, select Create, and enter:
Resource group: rg-cloudtrips-nfs-test-itn
Storage account name: stctnfsdmytrotestitn
Region: Italy North
Performance: Standard
Redundancy: Locally-redundant storage (LRS)
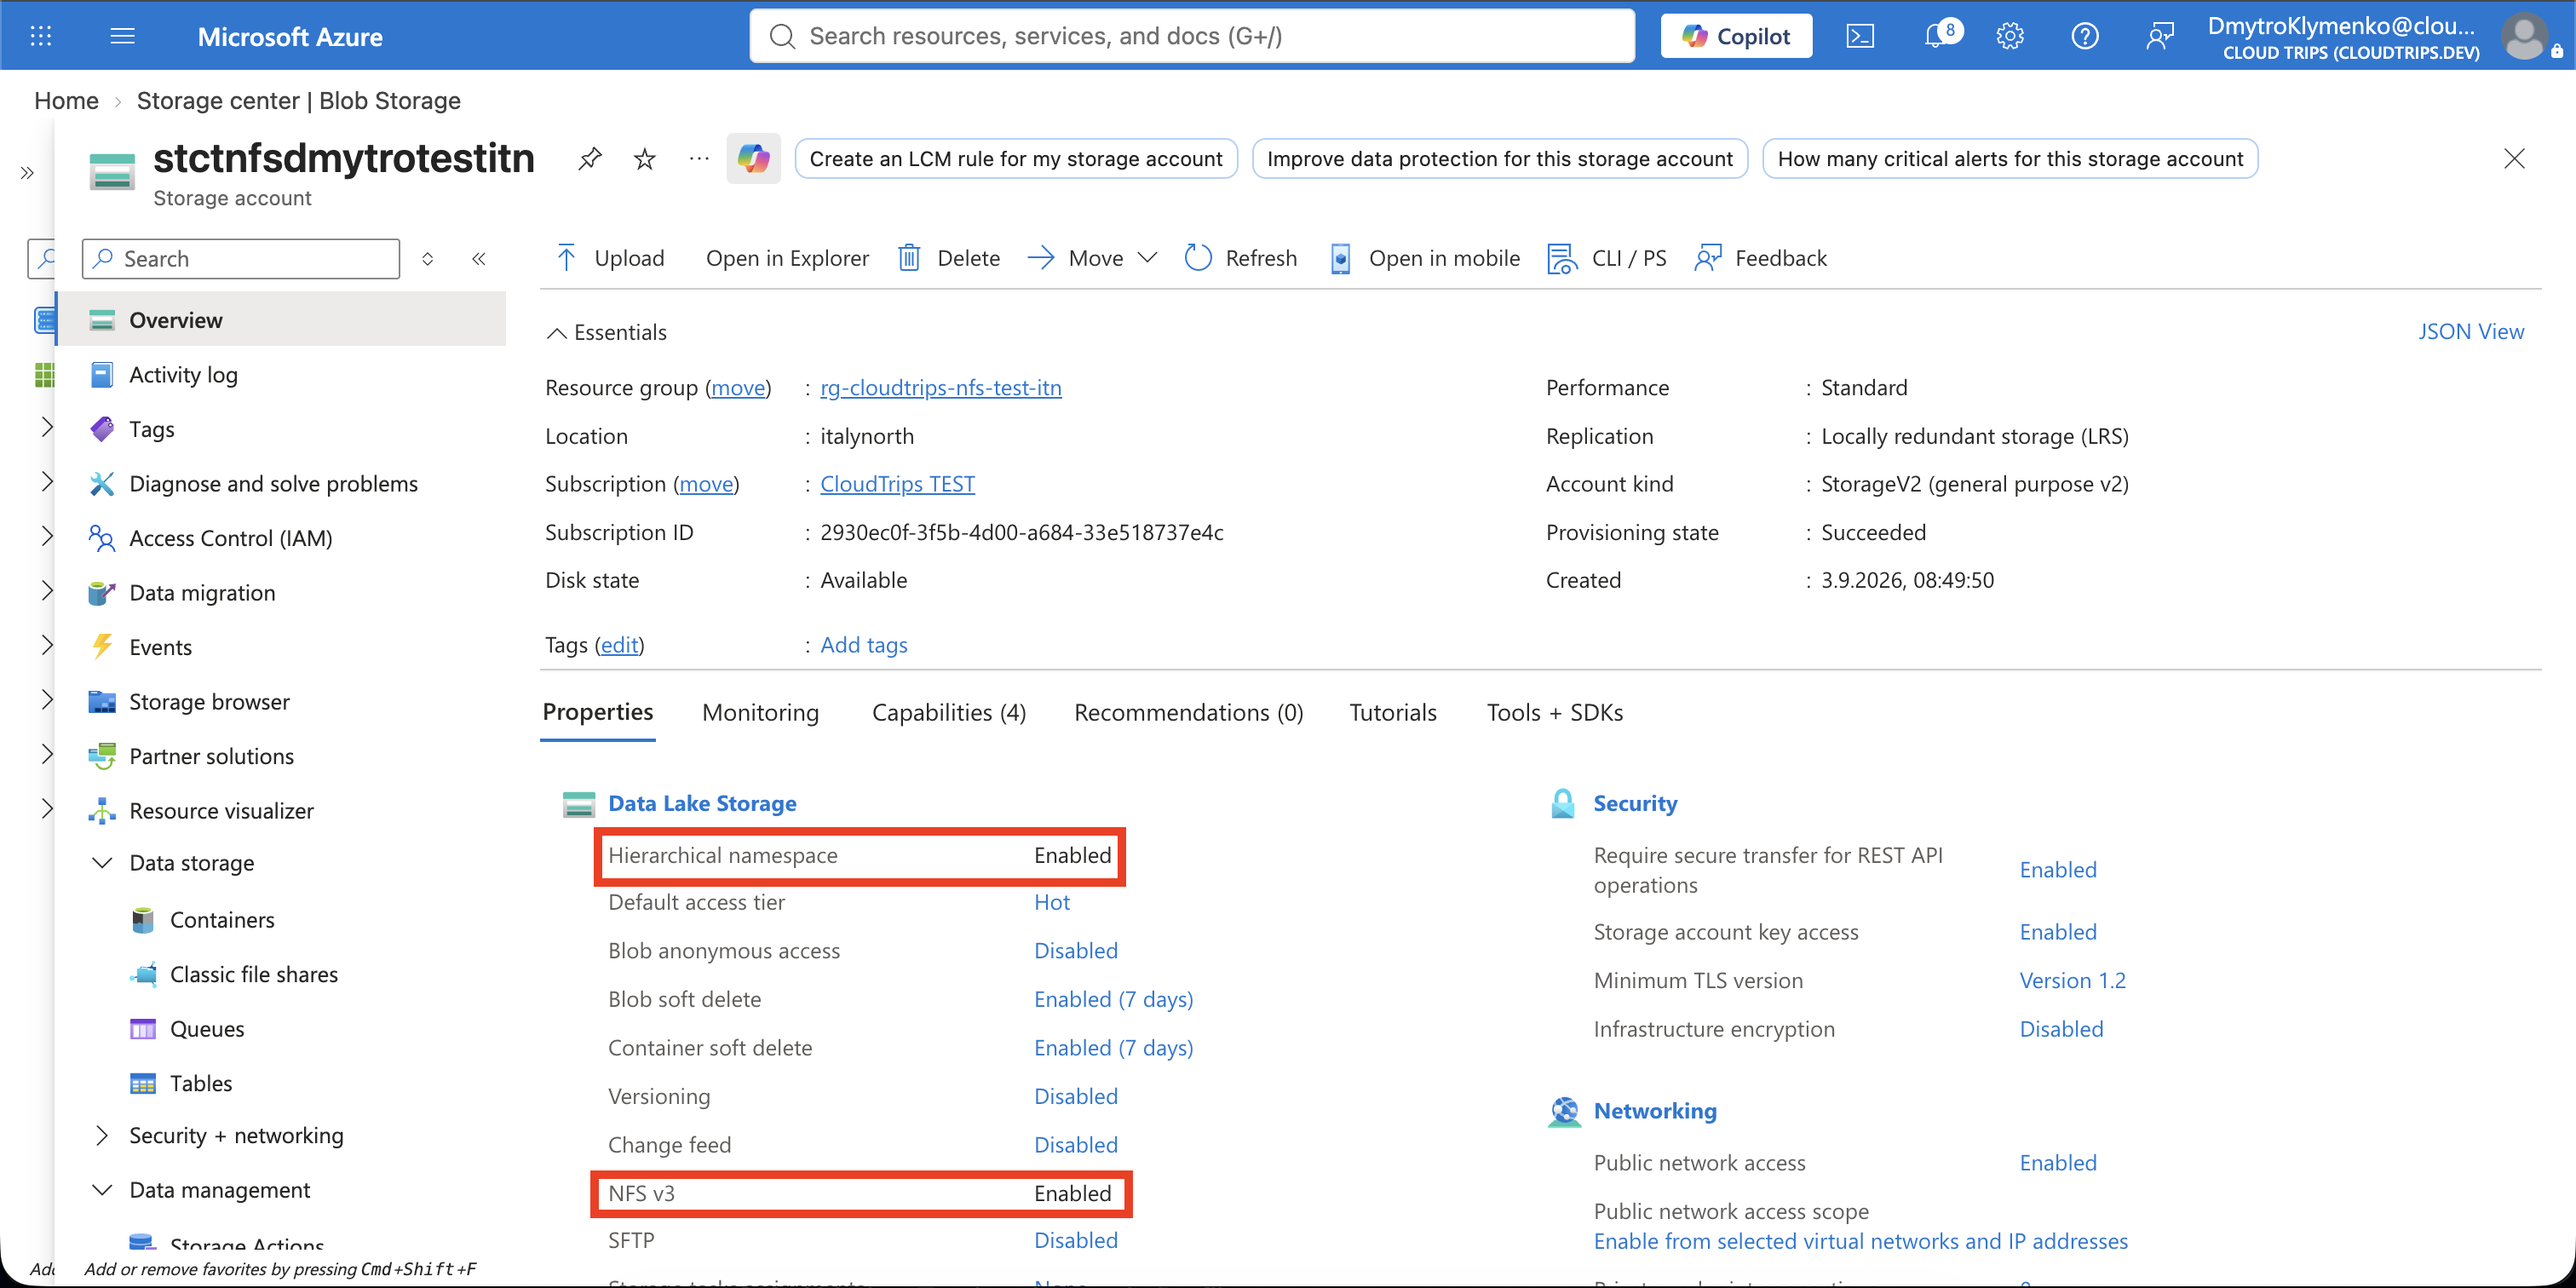
On Advanced, enable both settings:
Enable hierarchical namespace: Enabled
Enable network file system (NFS) v3: Enabled
Both are creation-time choices and cannot be disabled later. The hierarchical namespace supplies directories; NFS 3.0 supplies the Linux mount protocol.
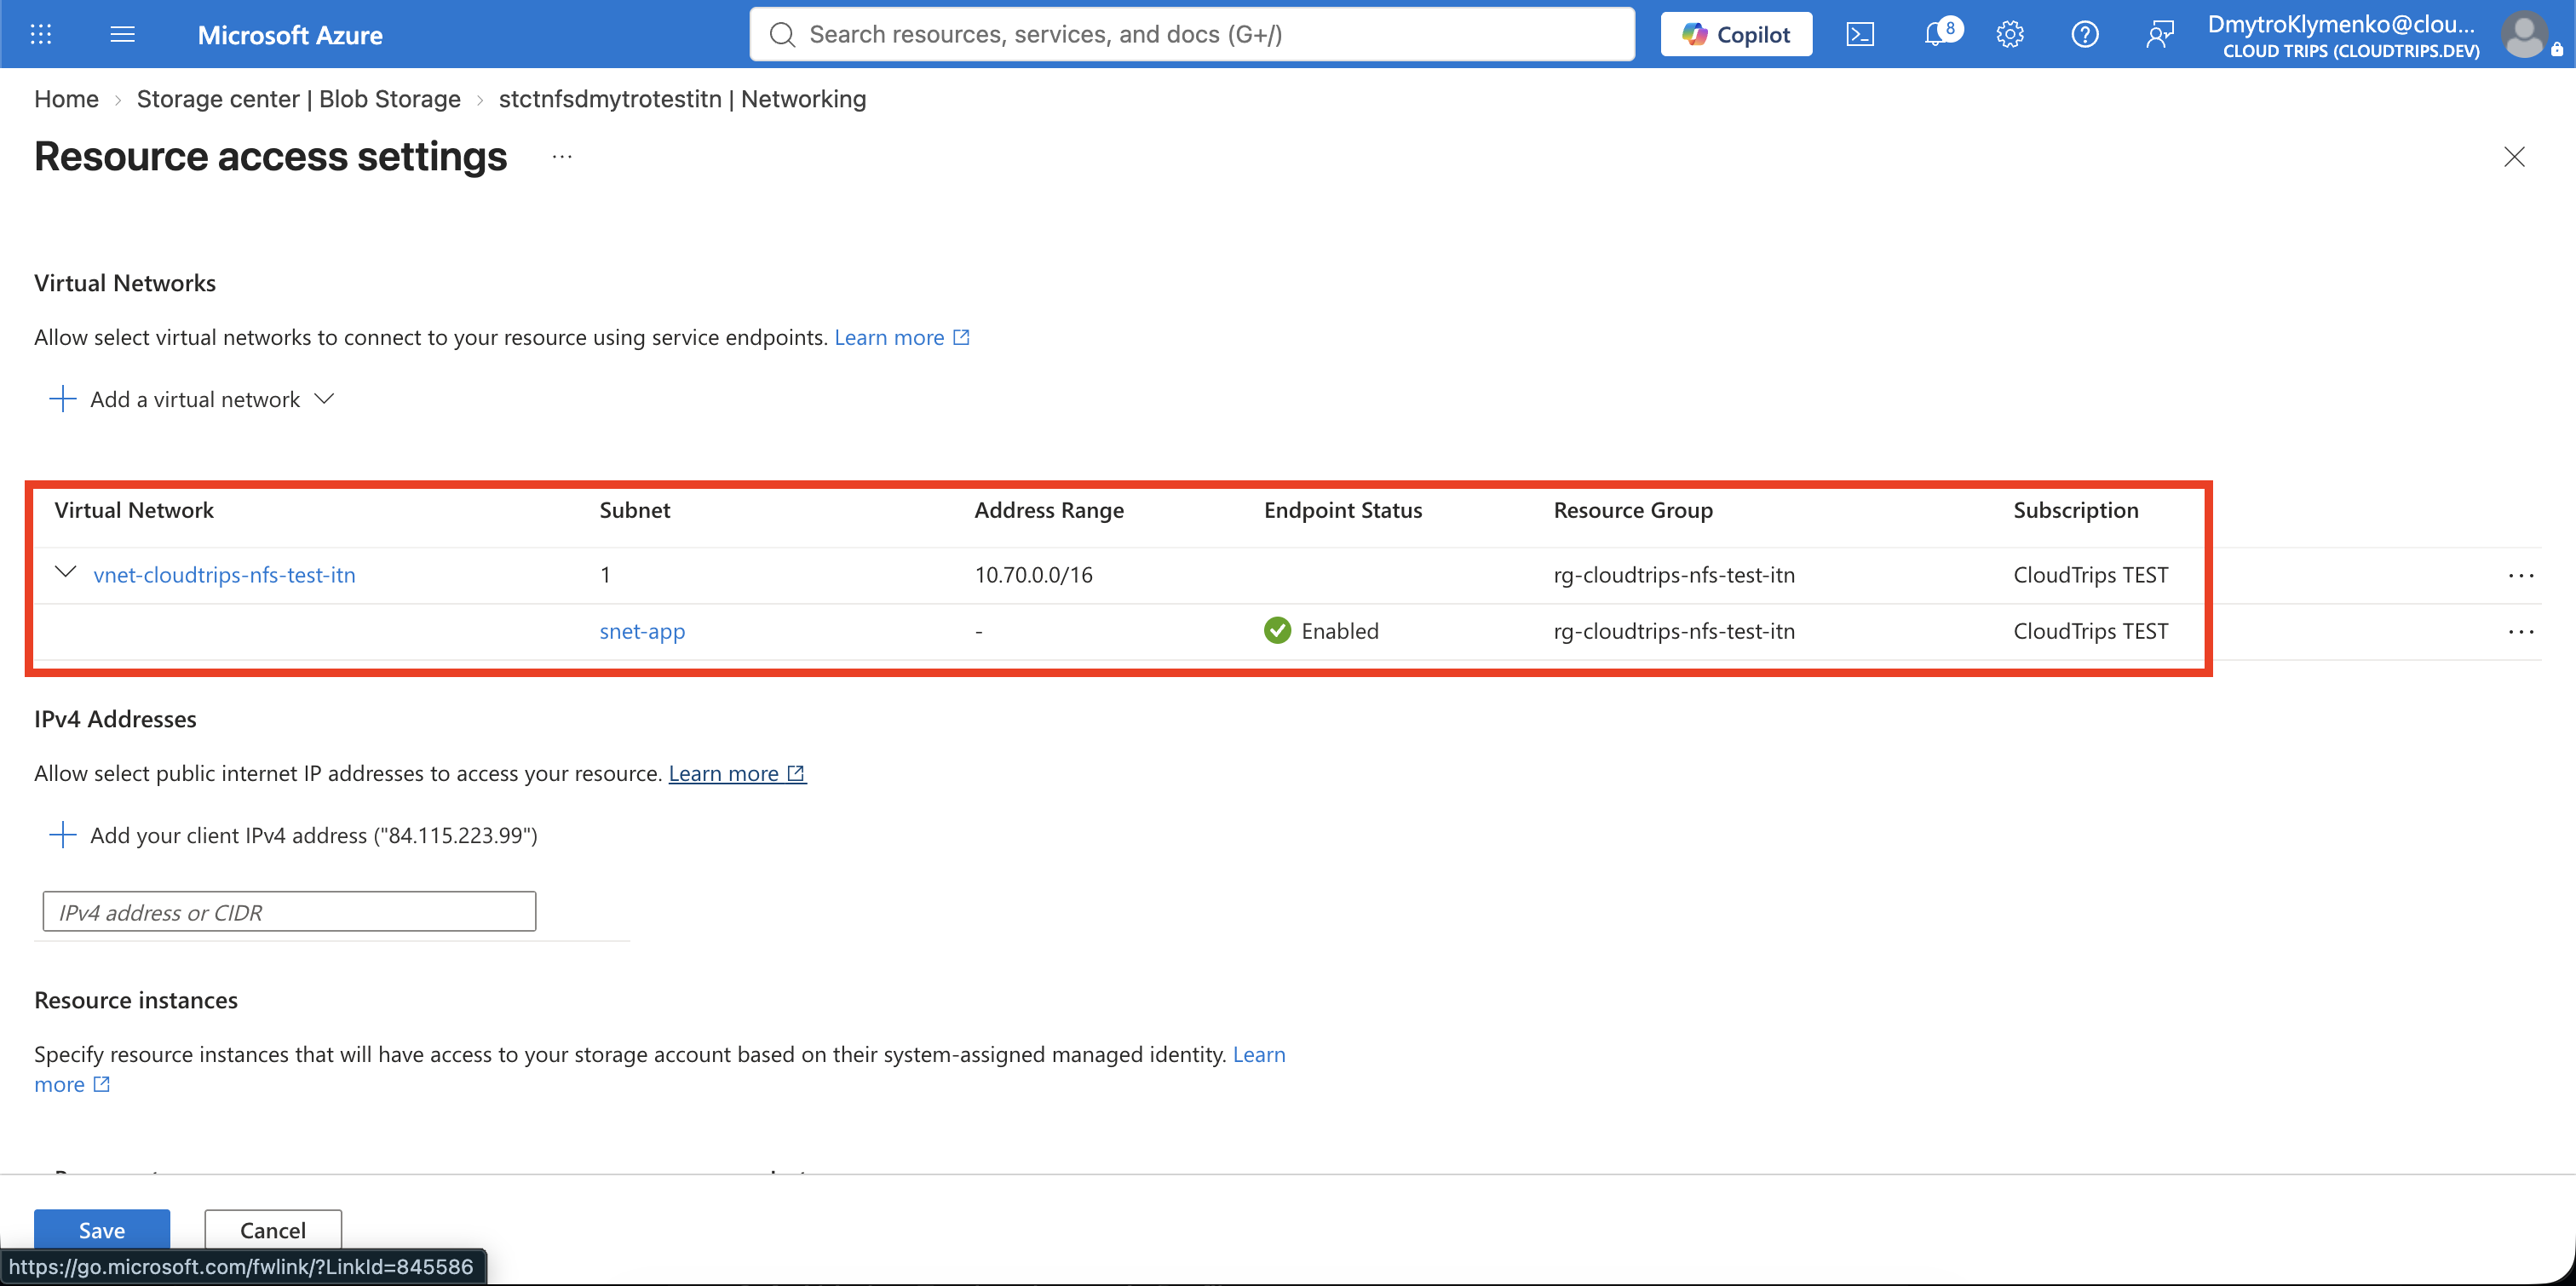
On Networking, select:
Network access: Enable public access from selected virtual networks and IP addresses
Virtual network: vnet-cloudtrips-nfs-test-itn
Subnet: snet-app
Do not add a public client IP. NFS traffic must originate from an allowed VNet, a permitted same-region peered VNet, or an on-premises network connected to it. Create the account.
Create the NFS Container
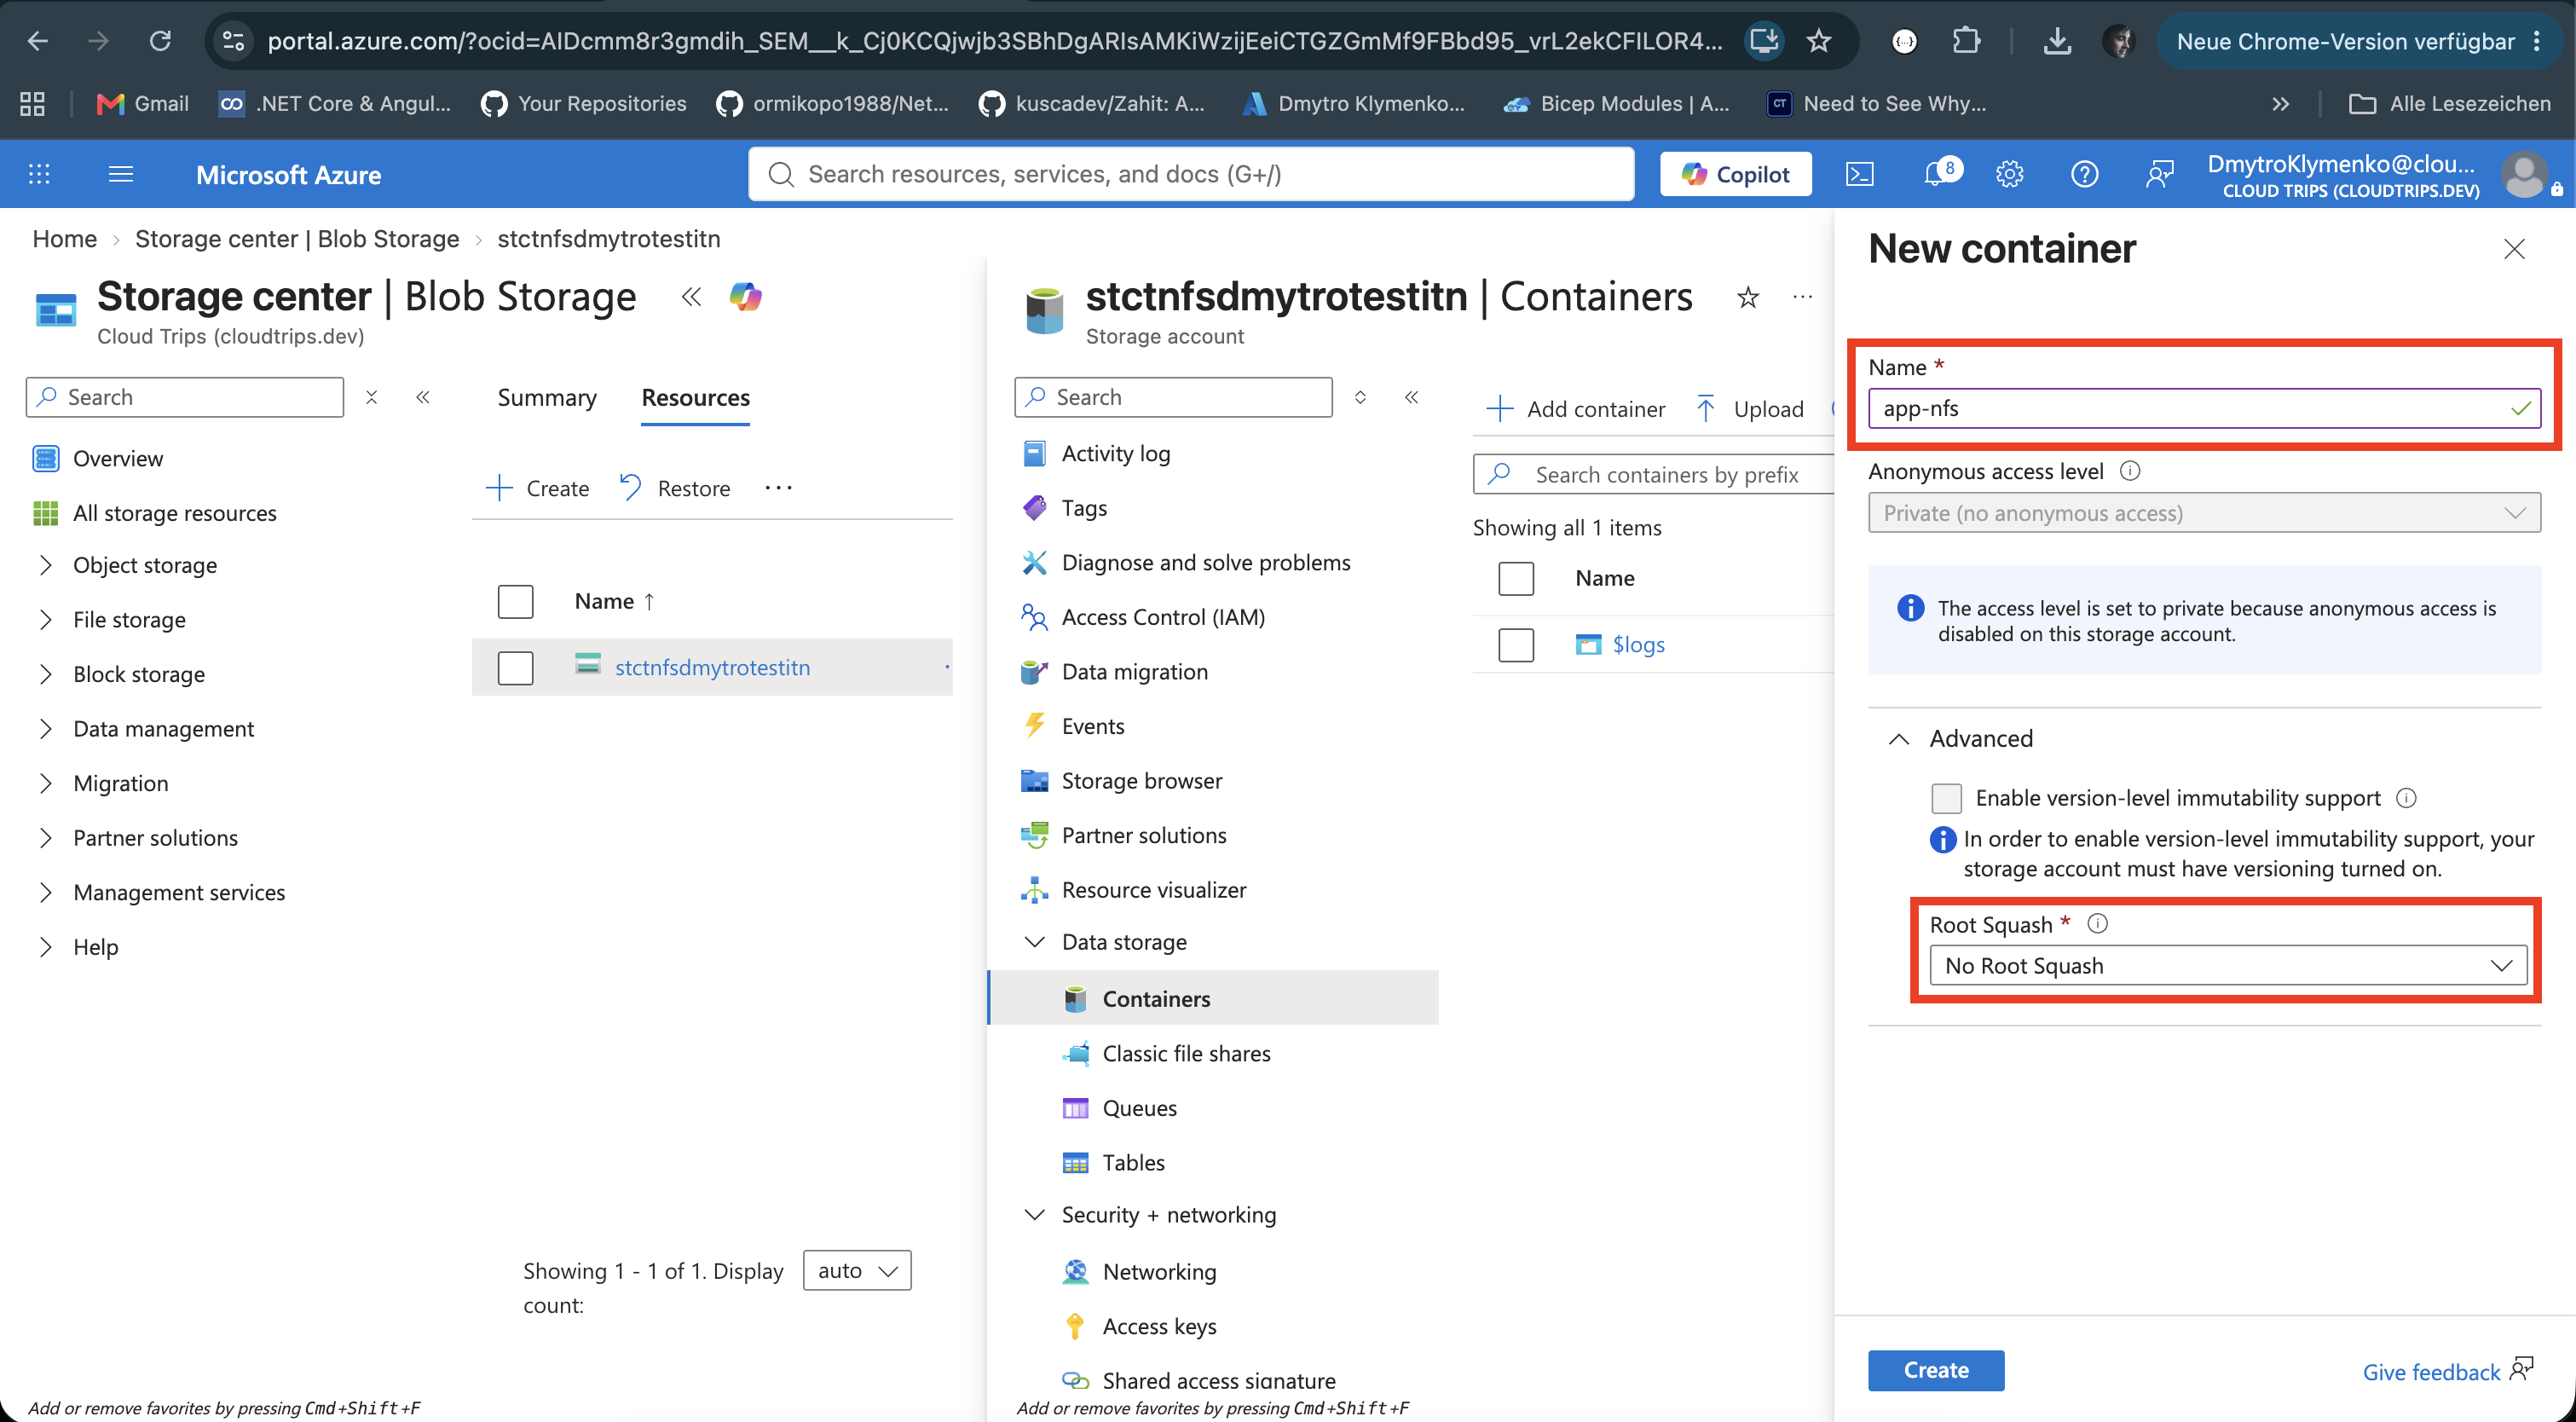
Open the storage account and select Data storage > Containers > + Container:
Name: app-nfs
Anonymous access level: Private (no anonymous access)
Keep the container’s root-squash setting at its generated lab default. In production, choose an appropriate root-squash policy so a remote root user does not receive more access than intended.
Mount the Container from Linux
SSH to the VM, install the Ubuntu NFS client and Microsoft’s AZNFS mount helper, and create a mount point:
sudo apt-get update
sudo apt-get install --yes nfs-common
wget \
  https://github.com/Azure/AZNFS-mount/releases/latest/download/aznfs_install.sh \
  --output-document=/tmp/aznfs_install.sh
sudo bash /tmp/aznfs_install.sh
sudo mkdir --parents /mnt/cloudtrips-nfs
When the installer asks Enable auto update for AZNFS mount helper, keep
<Yes> selected and press Enter. Downloading the script before running it
leaves the terminal input available for this interactive prompt.
Confirm that the helper’s endpoint-monitoring service is active:
systemctl is-active aznfswatchdogExpected result: active.
Mount the container. The remote path contains both the storage-account and container names:
sudo mount \
  --types aznfs \
  --options sec=sys,vers=3,nolock,proto=tcp \
  stctnfsdmytrotestitn.blob.core.windows.net:/stctnfsdmytrotestitn/app-nfs \
  /mnt/cloudtrips-nfs

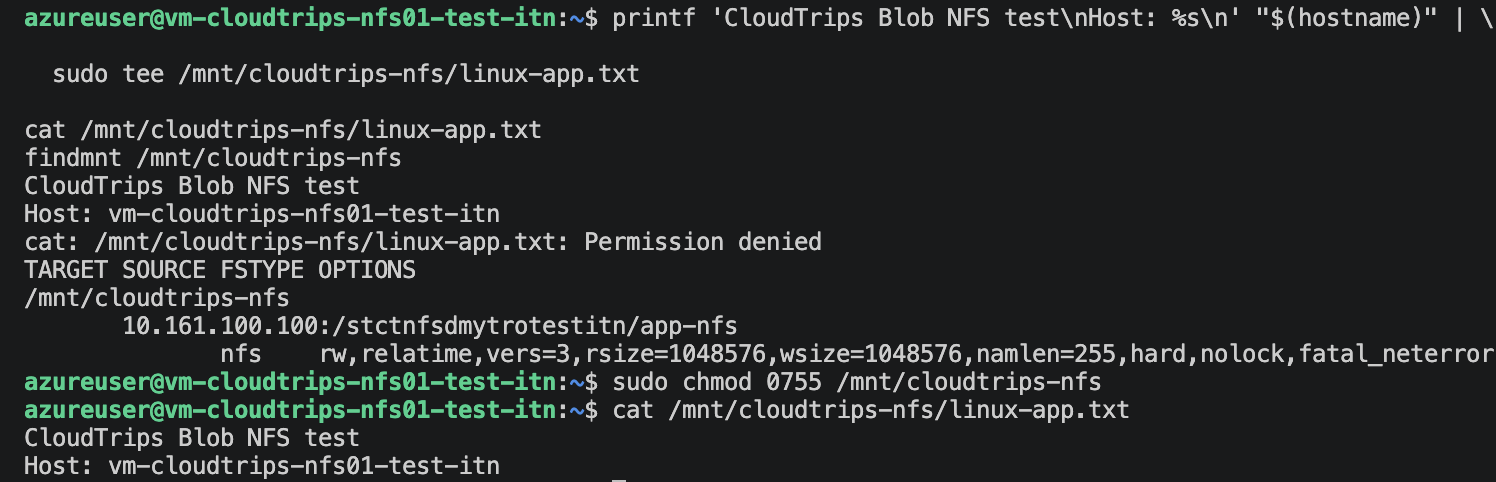
sudo chmod 0755 /mnt/cloudtrips-nfs
NFS 3.0 uses network identity and Unix UID/GID information rather than an Azure
password. The AZNFS helper keeps the mount connected if the storage endpoint IP
changes. nolock avoids relying on the Network Lock Manager (NLM) service.
On a traditional NFS server, NLM lets applications coordinate advisory locks so
two processes do not modify the same file simultaneously. Blob NFS does not
provide this locking service, so applications must coordinate concurrent writes
themselves and should not depend on NFS file locks for data consistency.
A new Blob NFS container normally has Unix mode 0750. Because its owner is
root, azureuser cannot traverse and read the directory even if a file itself
is readable. Changing the lab root directory to 0755 keeps writes restricted
to root but lets other users traverse and read it. Production permissions should
be selected for the application’s actual UID and GID instead.
Test the Mounted Storage
Write through the mounted directory and verify the result:
printf 'CloudTrips Blob NFS test\nHost: %s\n' "$(hostname)" | \
  sudo tee /mnt/cloudtrips-nfs/linux-app.txt

cat /mnt/cloudtrips-nfs/linux-app.txt
findmnt /mnt/cloudtrips-nfs
findmnt should report an NFS v3 mount, and the file content should be returned.
The portal’s container browser makes a data request from the administrator’s
current public IP, not from snet-app. Because only the VM subnet is allowed,
opening app-nfs can therefore return 403 even though the NFS mount works.
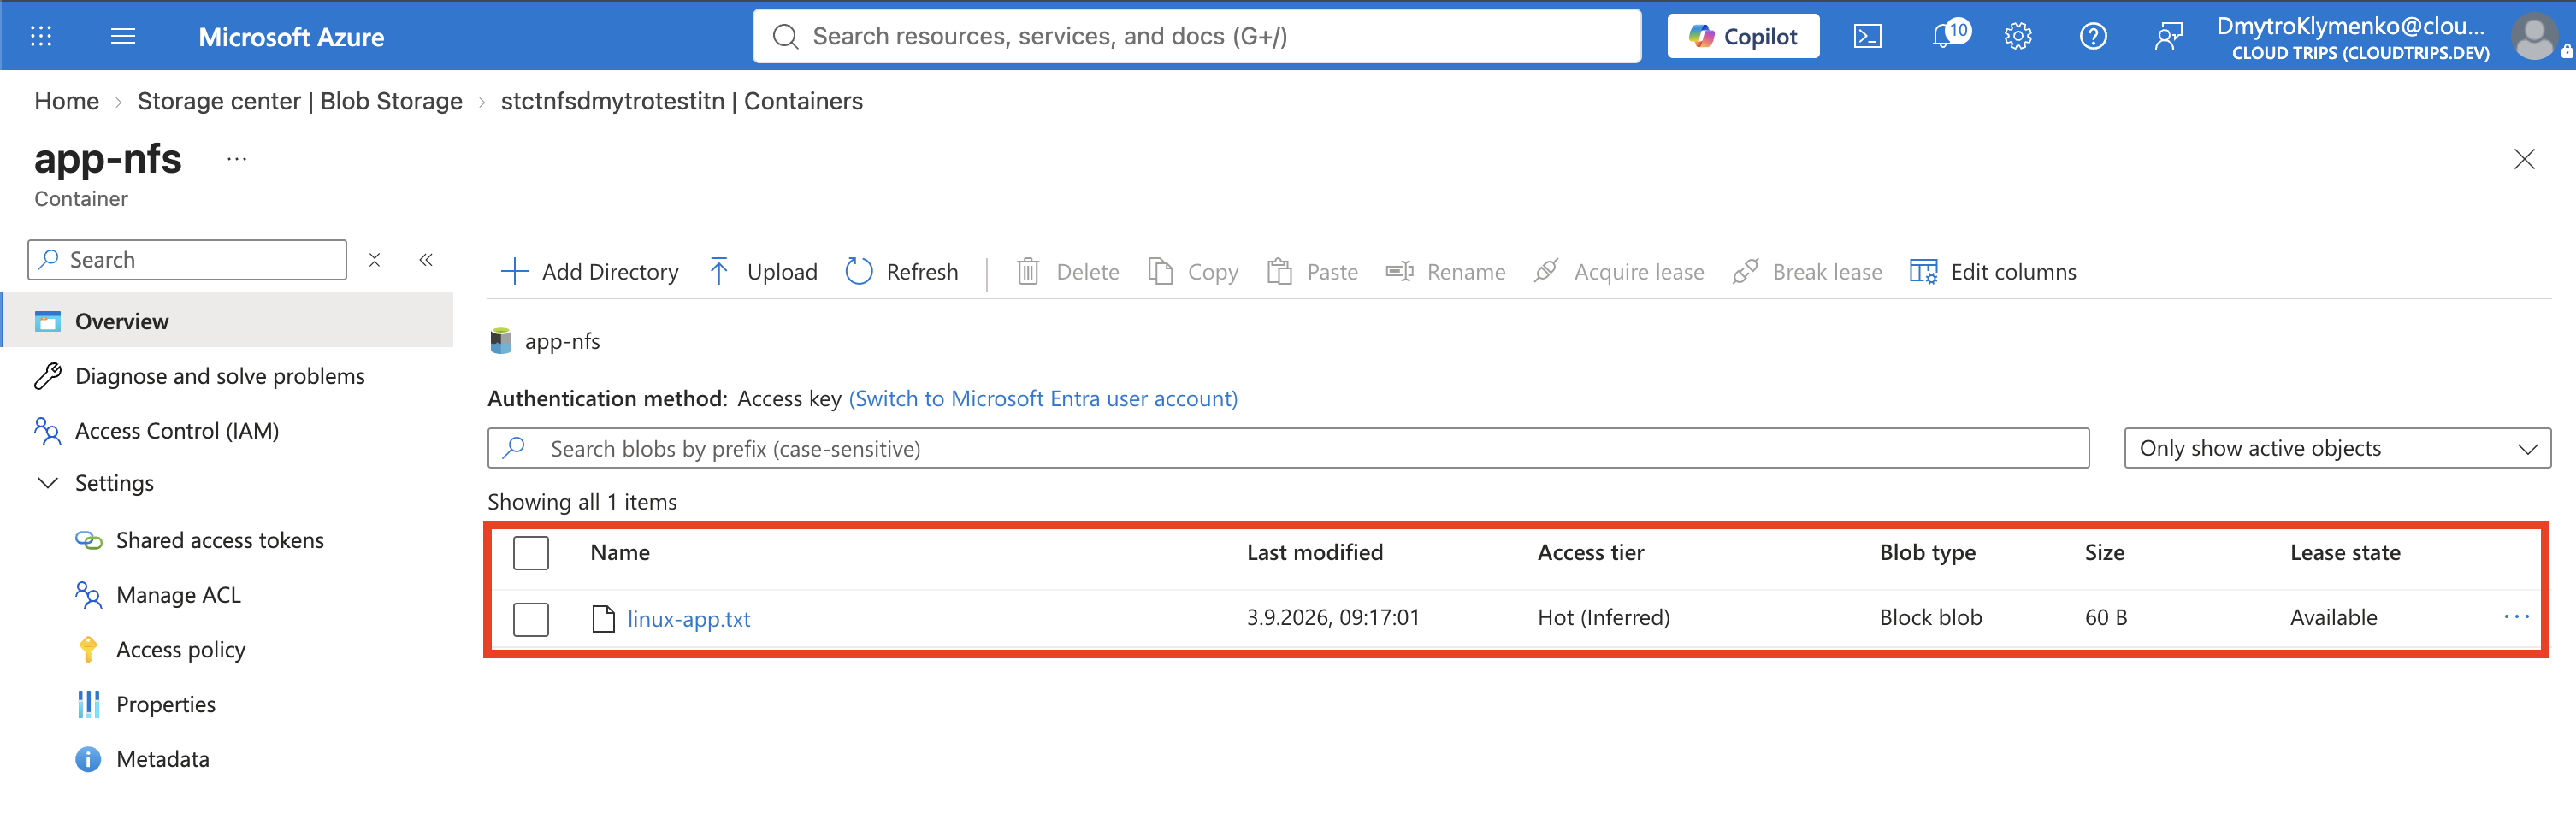
To capture the portal verification, open the storage account’s Networking
page. Keep Enabled from selected virtual networks and IP addresses, add the
current Client IP address, and save. Then open app-nfs and confirm that
linux-app.txt appears as a block blob. This demonstrates the two views of the
same data: a file through NFS and a blob through Azure Storage.
Return to Networking, remove the temporary client-IP rule, and save again. Do not switch to access from all networks. The IP rule permits portal and HTTPS Blob operations from that address; NFS access itself still depends on a supported VNet path.
This manual mount lasts until it is unmounted or the VM restarts. A production
VM can add the same AZNFS mount to /etc/fstab for automatic remounting; do not
add persistence for this disposable lab.
If mounting fails with access denied, confirm that the VM uses snet-app and
that the storage firewall permits that subnet. Also ensure outbound TCP ports
111 and 2048 are not blocked by a network security group.
Clean Up
Unmount the container before deleting the lab:
sudo umount /mnt/cloudtrips-nfsThen delete the standalone resource group:
az group delete \
  --name rg-cloudtrips-nfs-test-itn \
  --yes
Confirm that it is gone:
az group exists --name rg-cloudtrips-nfs-test-itnExpected result: false.