Virtual WAN Traffic Needs Control? Configure Routing Intent
The CloudTrips Virtual WAN hub automatically exchanges routes between its connected VNets. That provides connectivity, but it does not guarantee that traffic passes through a central security control.
Routing intent declares that an entire category of traffic must use a security solution in the virtual hub as its next hop. It controls the path; the firewall policy separately decides which connections are allowed or denied.
This trip adds an Azure Firewall to the existing hub and sends private traffic through it. Internet routing remains unchanged.
This trip builds on: Global Branch Network Needs a Hub? Create Virtual WAN. If you deleted that lab, follow the previous trip again through Verify the Managed Routes to recreate its resource group, Virtual WAN, virtual hub, two test VNets, and two VNet connections. Do not run its cleanup before continuing here.
Before creating the firewall, confirm the existing hub uses the required address space:
az resource show \
  --resource-group rg-cloudtrips-vwan-test-weu \
  --name vhub-cloudtrips-test-weu \
  --resource-type Microsoft.Network/virtualHubs \
  --query properties.addressPrefix \
  --output tsv
Continue only if the command returns 10.70.0.0/22. If it returns the older
10.70.0.0/23, stop and recreate the temporary hub by following the corrected
previous trip. A Virtual WAN hub address space cannot be resized after the hub
is created, and Azure Firewall requires at least /22 in this design.
Understand the Two Policies
Routing intent supports two broad traffic categories:
Private traffic
  -> traffic between VNets, branches, and virtual hubs
  -> includes 10.0.0.0/8, 172.16.0.0/12, and 192.168.0.0/16 by default

Internet traffic
  -> traffic whose destination is 0.0.0.0/0
CloudTrips will configure only Private traffic. The intended path becomes:
App VNet -> Virtual Hub -> Azure Firewall -> Virtual Hub -> Services VNetWithout routing intent, the managed hub router sends traffic directly between the two VNet connections. Routing intent makes Azure maintain the necessary hub routes automatically; no UDR is attached to either workload subnet.
Check the Existing Hub Routing
Open vwan-cloudtrips-test, select Connectivity > Hubs, and open
vhub-cloudtrips-test-weu.
Under Routing, open Route Tables and select Default. Its underlying
resource name is defaultRouteTable. Do not select None, whose resource
name is noneRouteTable. Confirm that Default has no custom static routes.
The VNet prefixes shown under effective routes are dynamically learned and do
not need to be removed.
An empty route list on the Basics tab is the expected result here. That tab shows manually configured static routes, not routes dynamically learned from the VNet connections. Do not select + Add route. Learned routes are viewed separately under Effective Routes.
Do not change Propagations in this route-table editor. The portal can show No and 0 selected and restore those values after saving. This is expected because CloudTrips has no VPN, ExpressRoute, or User VPN branch connections to select here. The two VNet connections already carry their own routing configuration, and routing intent will manage their route association and propagation automatically.
Do not create another route table; routing intent requires the built-in
defaultRouteTable and noneRouteTable only.
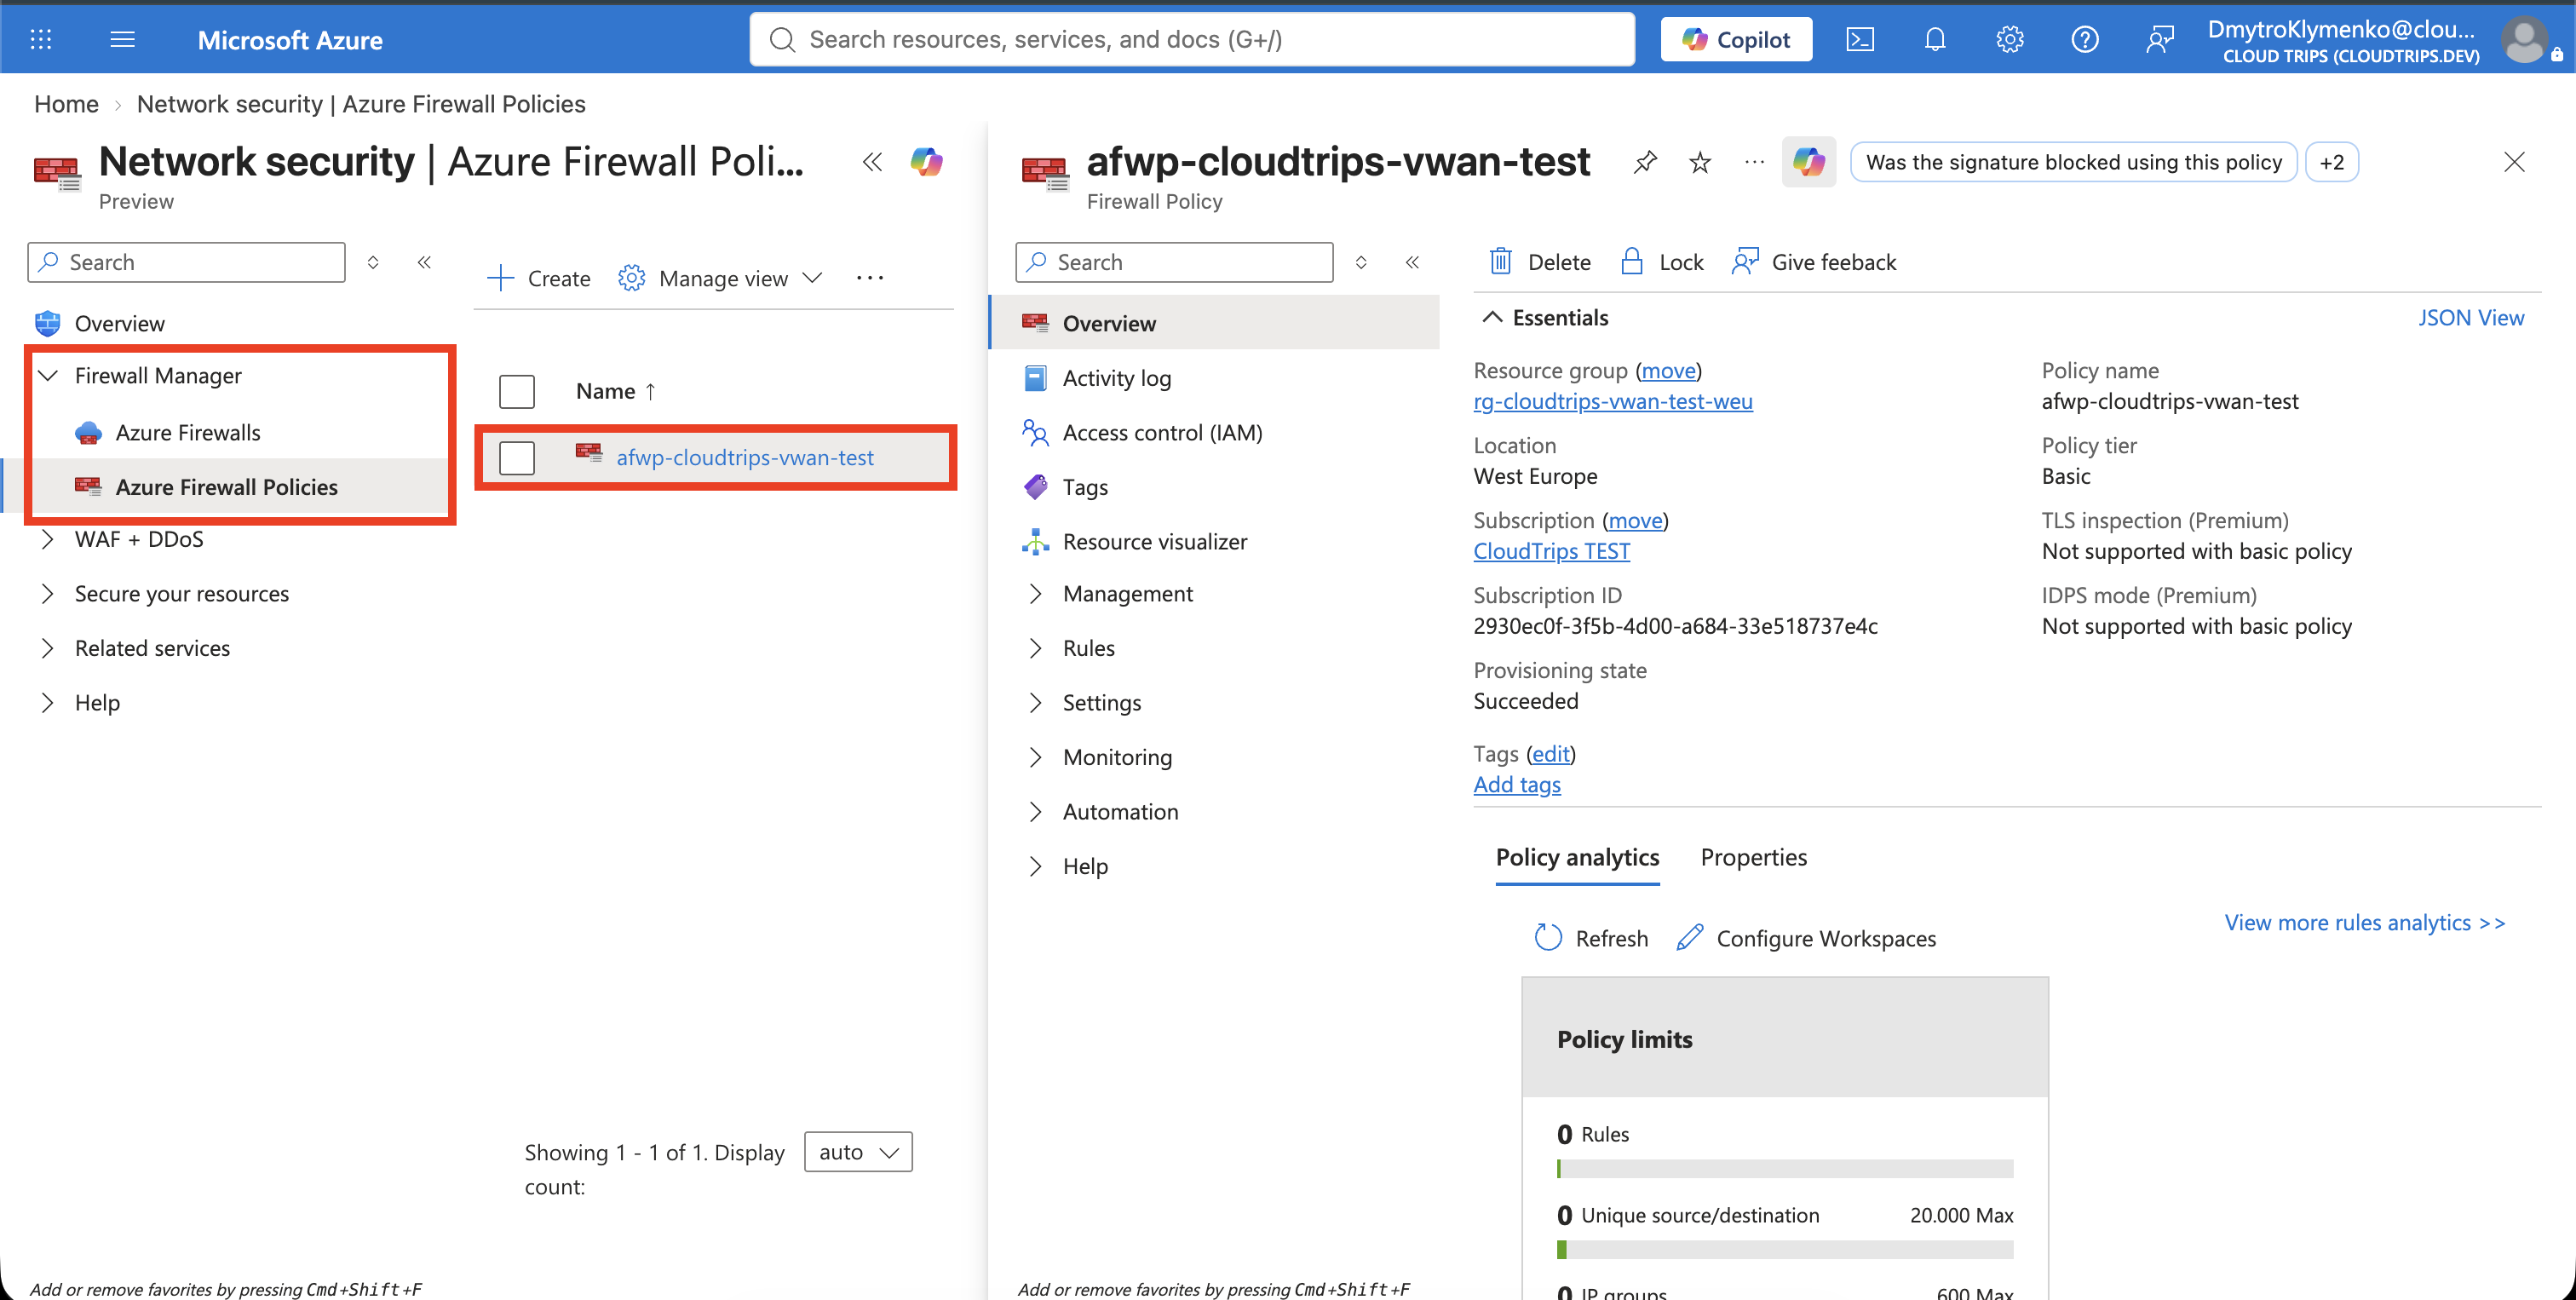
Create a Firewall Policy
Search the portal for Firewall Manager, open Azure Firewall Policies, and select Create Azure Firewall Policy.
Configure:
Subscription: CloudTrips TEST
Resource group: rg-cloudtrips-vwan-test-weu
Name: afwp-cloudtrips-vwan-test
Region: West Europe
Policy tier: Basic
Parent policy: None
Use Basic for this short routing exercise. Standard or Premium is required only when the workload needs their additional inspection capabilities. Leave the policy without custom rules; Azure Firewall denies unmatched traffic by default.
Select Review + create, and then select Create.
Add Azure Firewall to the Virtual Hub
Return to vhub-cloudtrips-test-weu. Under Security, select Azure
Firewall and Firewall Manager, and select Next: Azure Firewall at the
bottom of the page.
Do not select Create new secured virtual hub from the general Firewall
Manager page. That action creates another hub. Because
vhub-cloudtrips-test-weu is already open, Next: Azure Firewall converts
this existing hub by installing Azure Firewall in it. The correct wizard asks
for firewall settings; it does not ask for another hub name or hub address
space.
Select Deploy a firewall with an existing policy. This deploys a new Azure Firewall inside the existing virtual hub and associates the policy created in the previous step. Do not choose the option that creates another policy.
Enable Azure Firewall and configure:
Firewall tier: Basic
Firewall policy: afwp-cloudtrips-vwan-test
Public IP addresses: Keep the minimum offered by the portal
Leave trusted security partners disabled. Review the configuration and start
the deployment. Azure creates the firewall inside the Microsoft-managed hub;
you do not create AzureFirewallSubnet yourself.
Wait until the hub shows Secured and the Azure Firewall provisioning state is Succeeded. Also wait until the virtual hub is no longer Updating and its routing state is Provisioned. Deployment can take 20–30 minutes, and routing intent must not be saved while the hub is still updating.
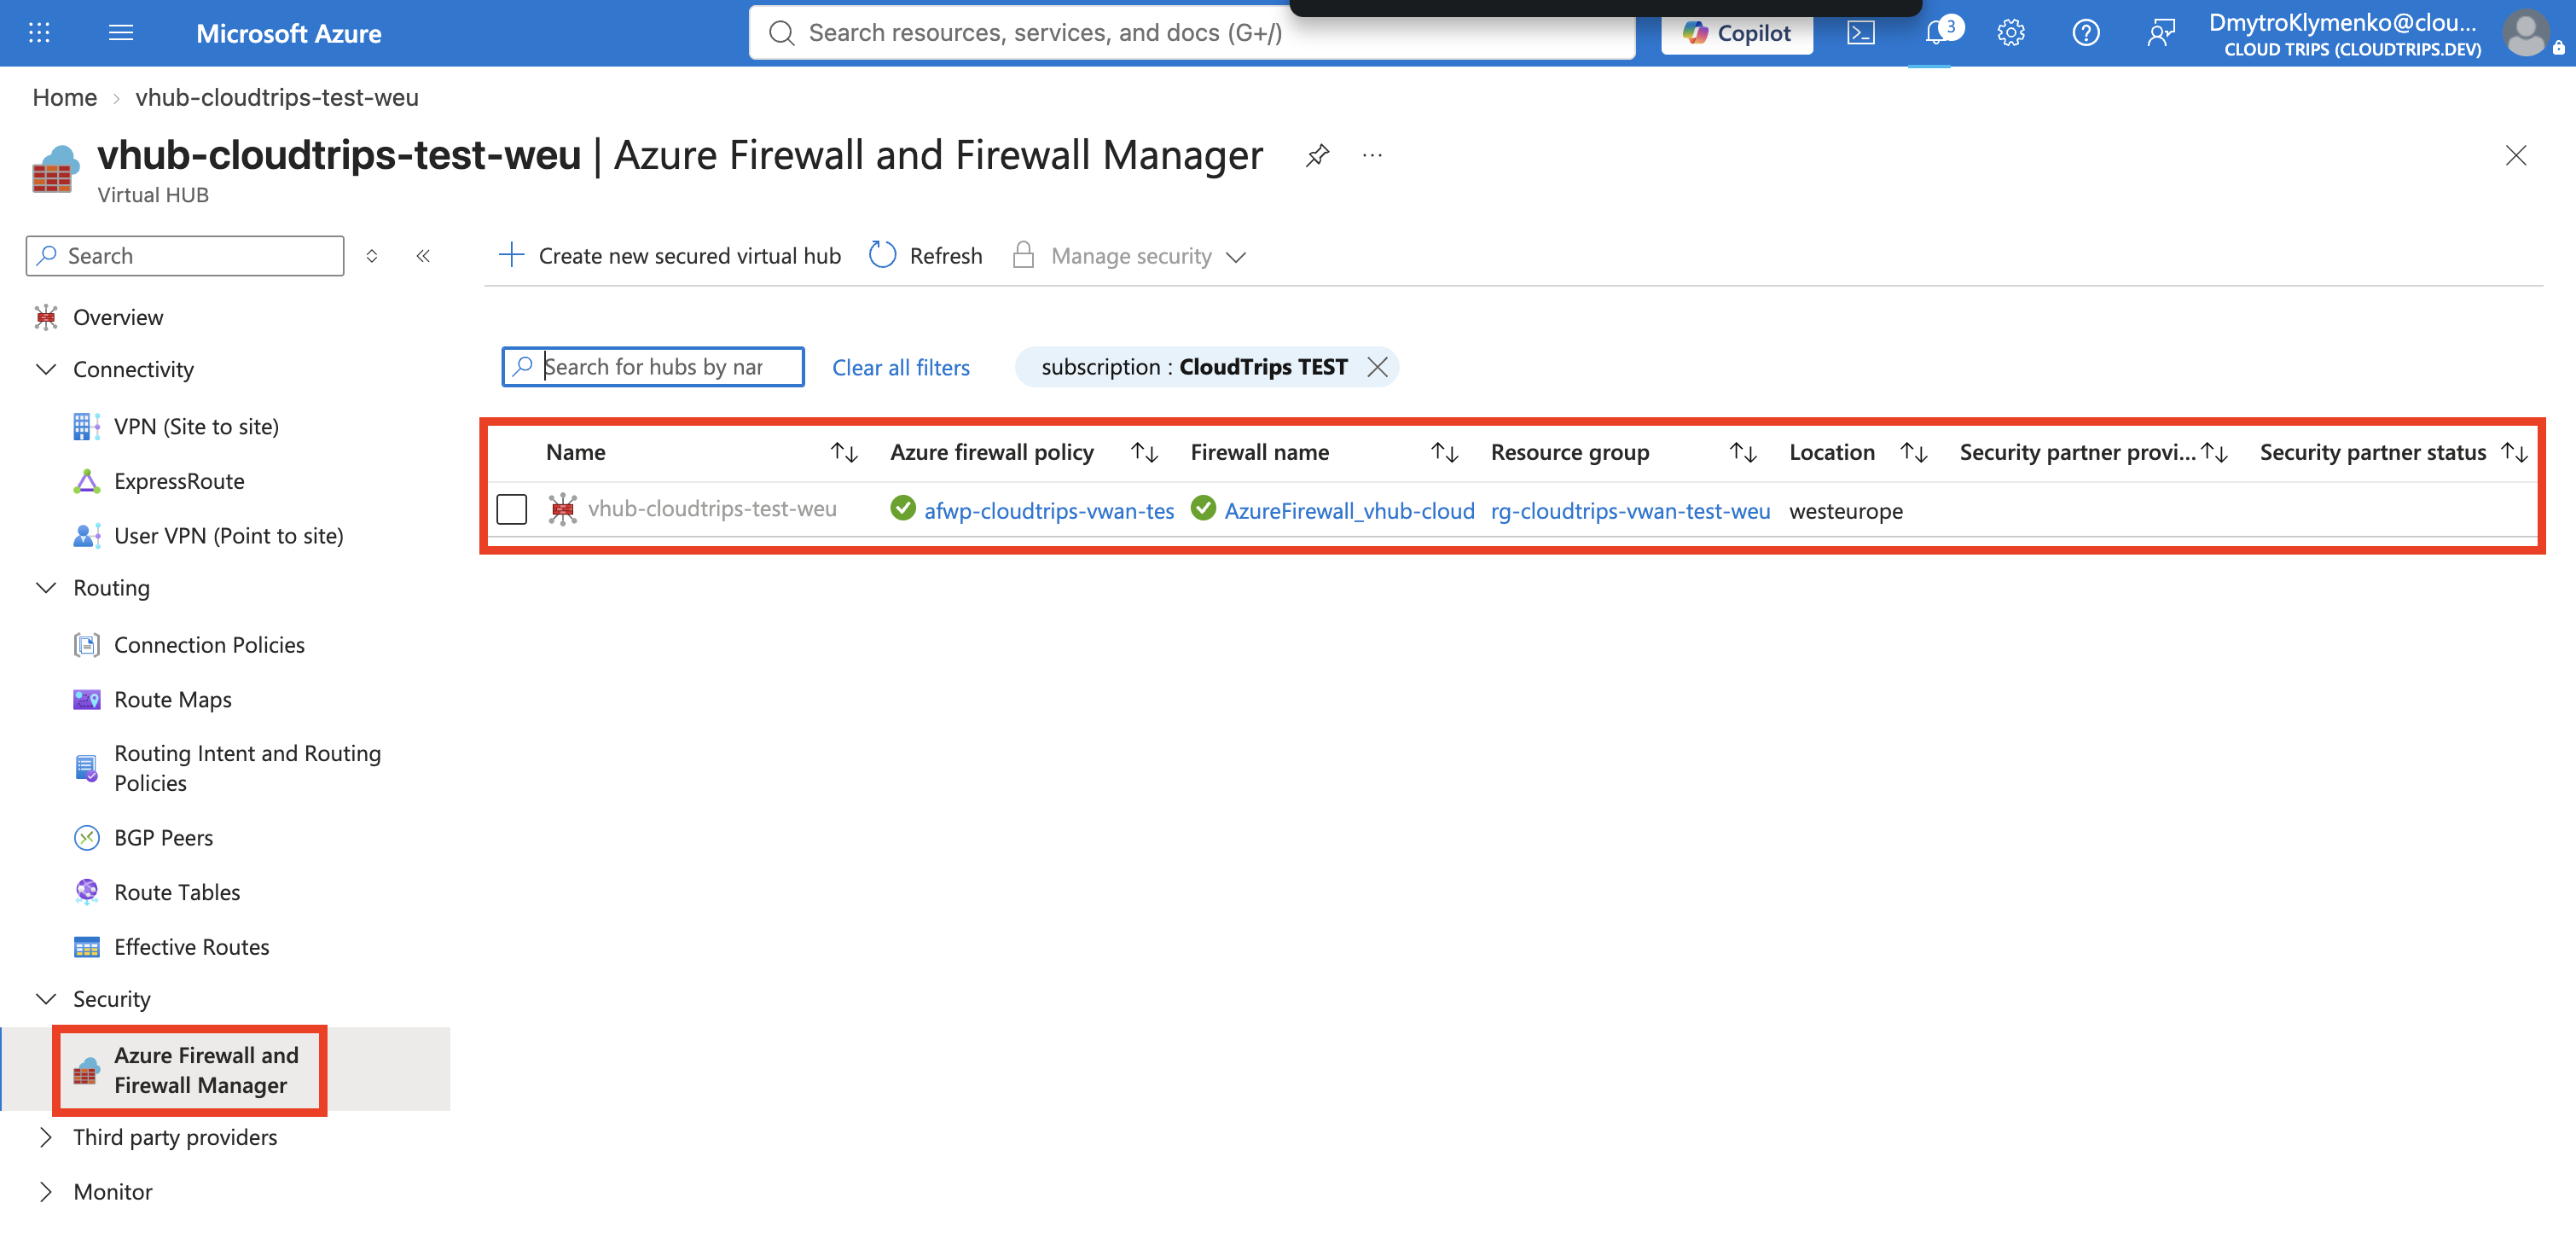
Azure Firewall and the secured virtual hub are billable while provisioned. Complete the remaining steps and cleanup in the same lab session.
The hub is now capable of inspecting traffic, but simply installing a firewall does not yet force the VNet connections to use it.
Configure Private-Traffic Routing Intent
In vhub-cloudtrips-test-weu, select Routing > Routing Intent and Routing
Policies.
Configure:
Private traffic: Select the Azure Firewall in vhub-cloudtrips-test-weu
Internet traffic: None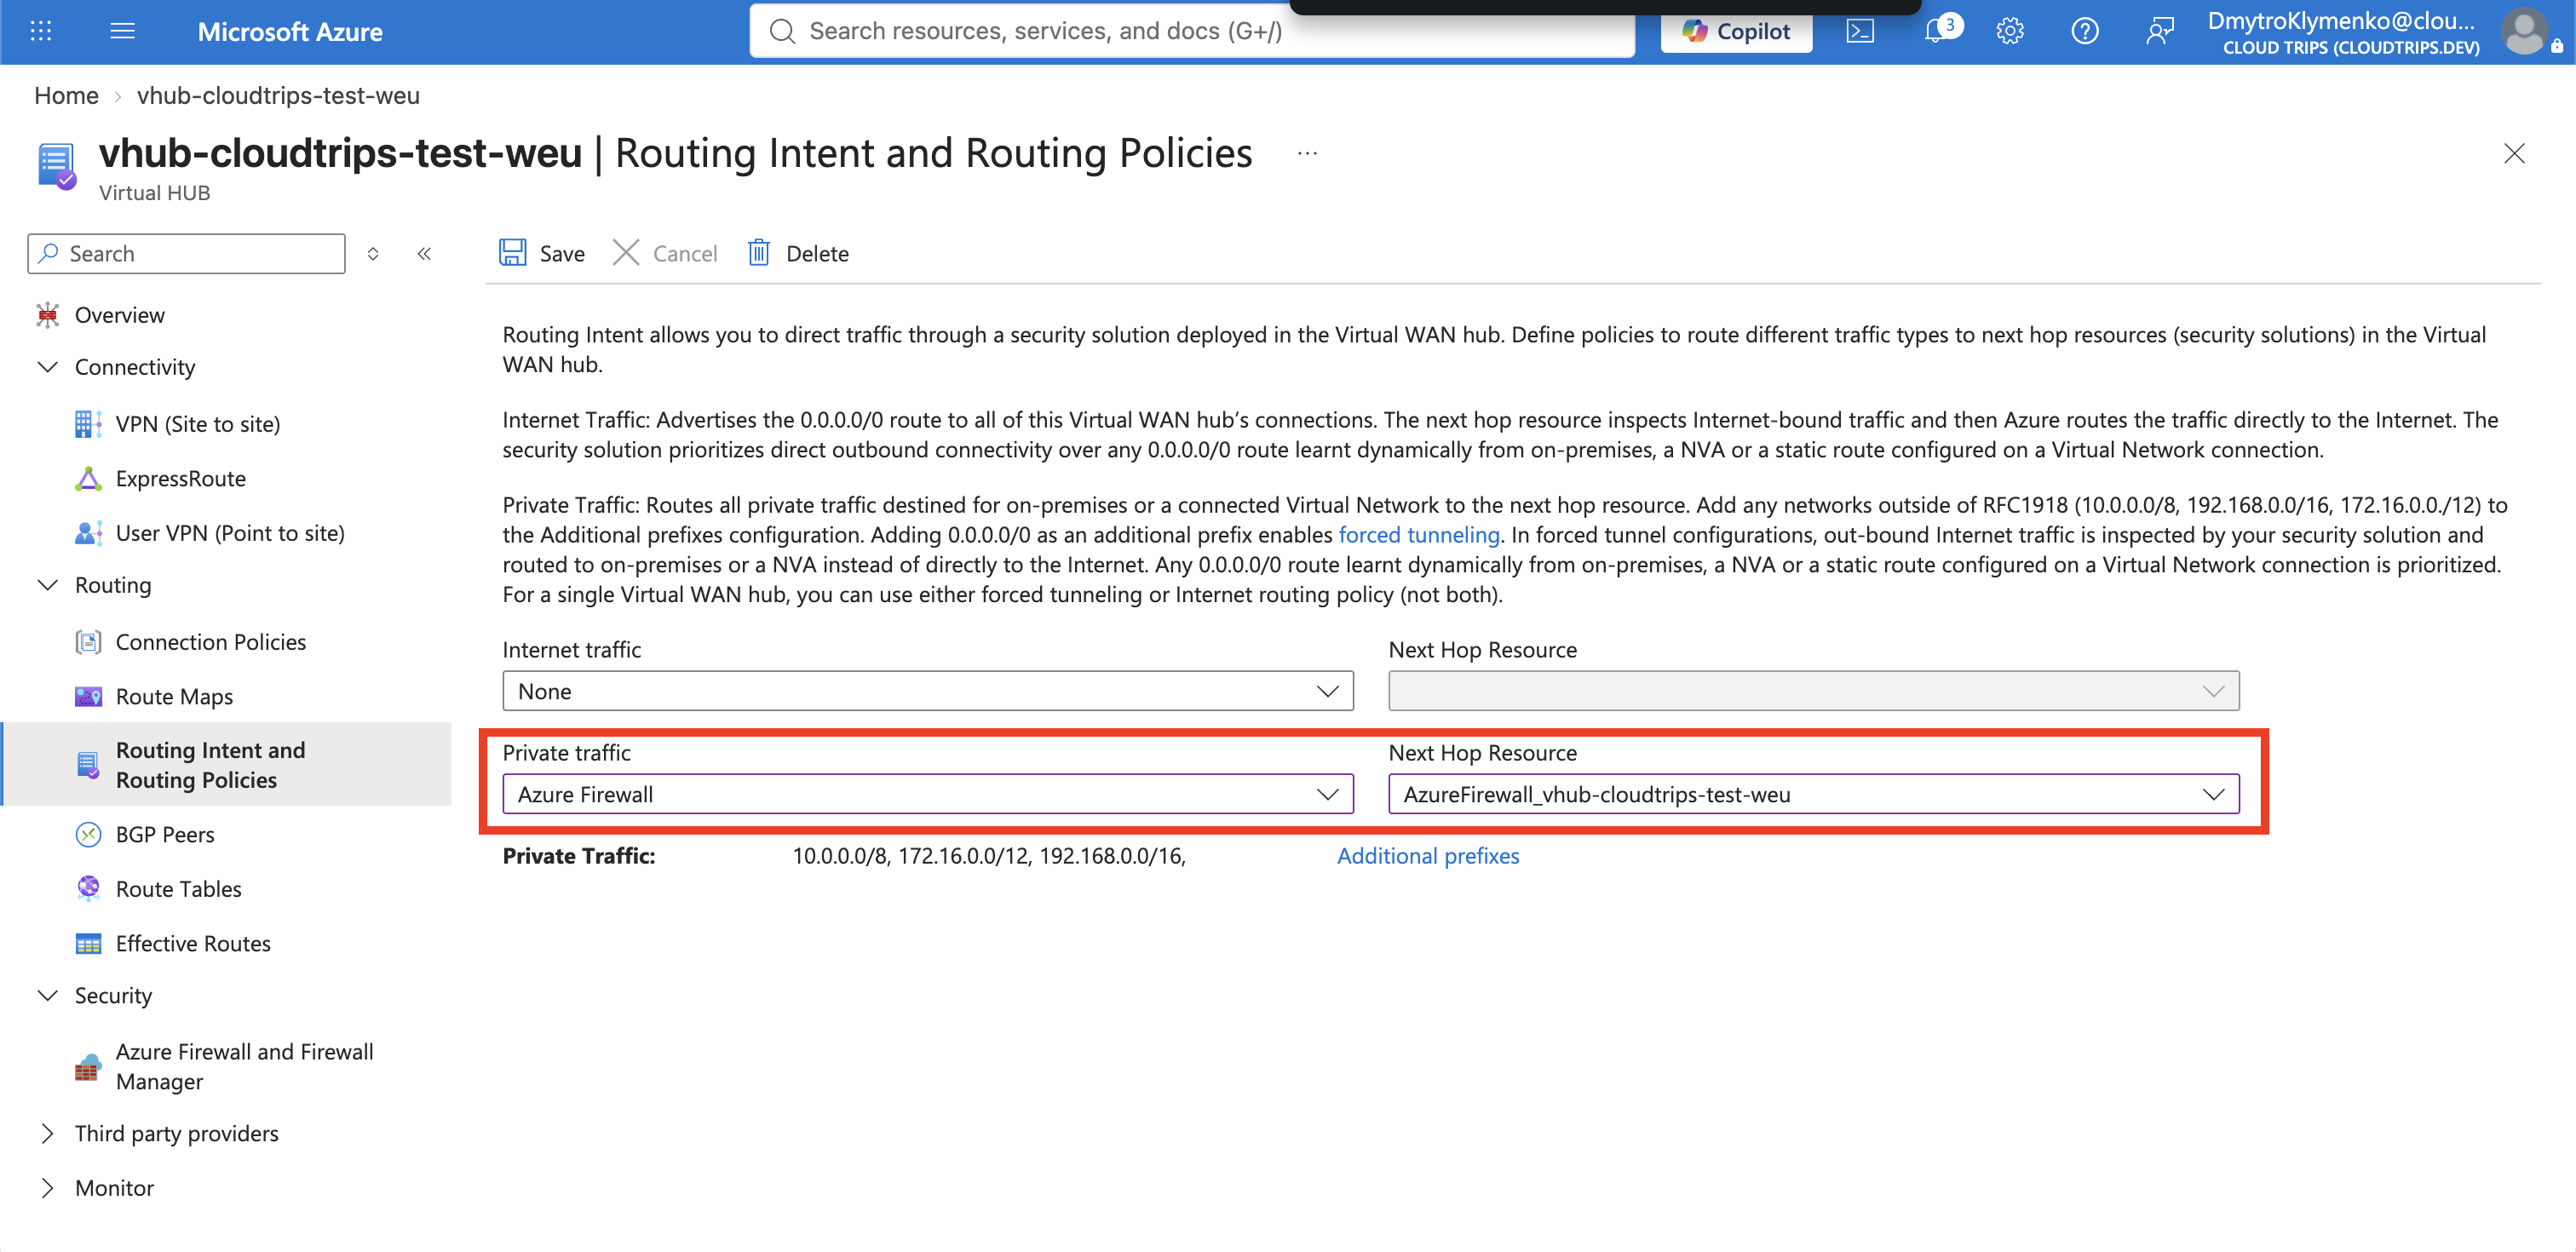
Select Save. Wait until the routing-intent provisioning state is Succeeded before checking the routes. Applying the managed routes can take several additional minutes.
If an earlier attempt shows Failed with InvalidNextHop, delete that
failed routing intent. Confirm that the hub routing state is Provisioned
and the firewall state is Succeeded, then configure and save it again. The
firewall and its policy do not need to be recreated.
The private policy covers both temporary VNet prefixes because they are inside
10.0.0.0/8. Internet traffic is not redirected in this trip, so routing
intent does not add a 0.0.0.0/0 policy route.
Verify the Generated Route
Under Routing, open Effective Routes and select Default
(defaultRouteTable). Confirm that the effective routes include:
Destinations: 10.0.0.0/8, 172.16.0.0/12, 192.168.0.0/16
Next hop: Azure Firewall
The portal can display the generated route as _policy_PrivateTraffic, use a
different policy-managed name, or omit its name from the effective-routes
view. The name is not the verification target. Do not select + Add route
and do not create this route manually; routing intent owns it. If the prefixes
are not visible, confirm that both the firewall and routing intent show
Succeeded, wait several minutes, and refresh Effective Routes.
If Effective Routes shows only 10.71.0.0/16 and 10.72.0.0/16 with next
hop type Virtual Network Connection, routing intent has not taken effect
yet. Return to Routing Intent and Routing Policies, confirm the private
traffic selection, and select Save.
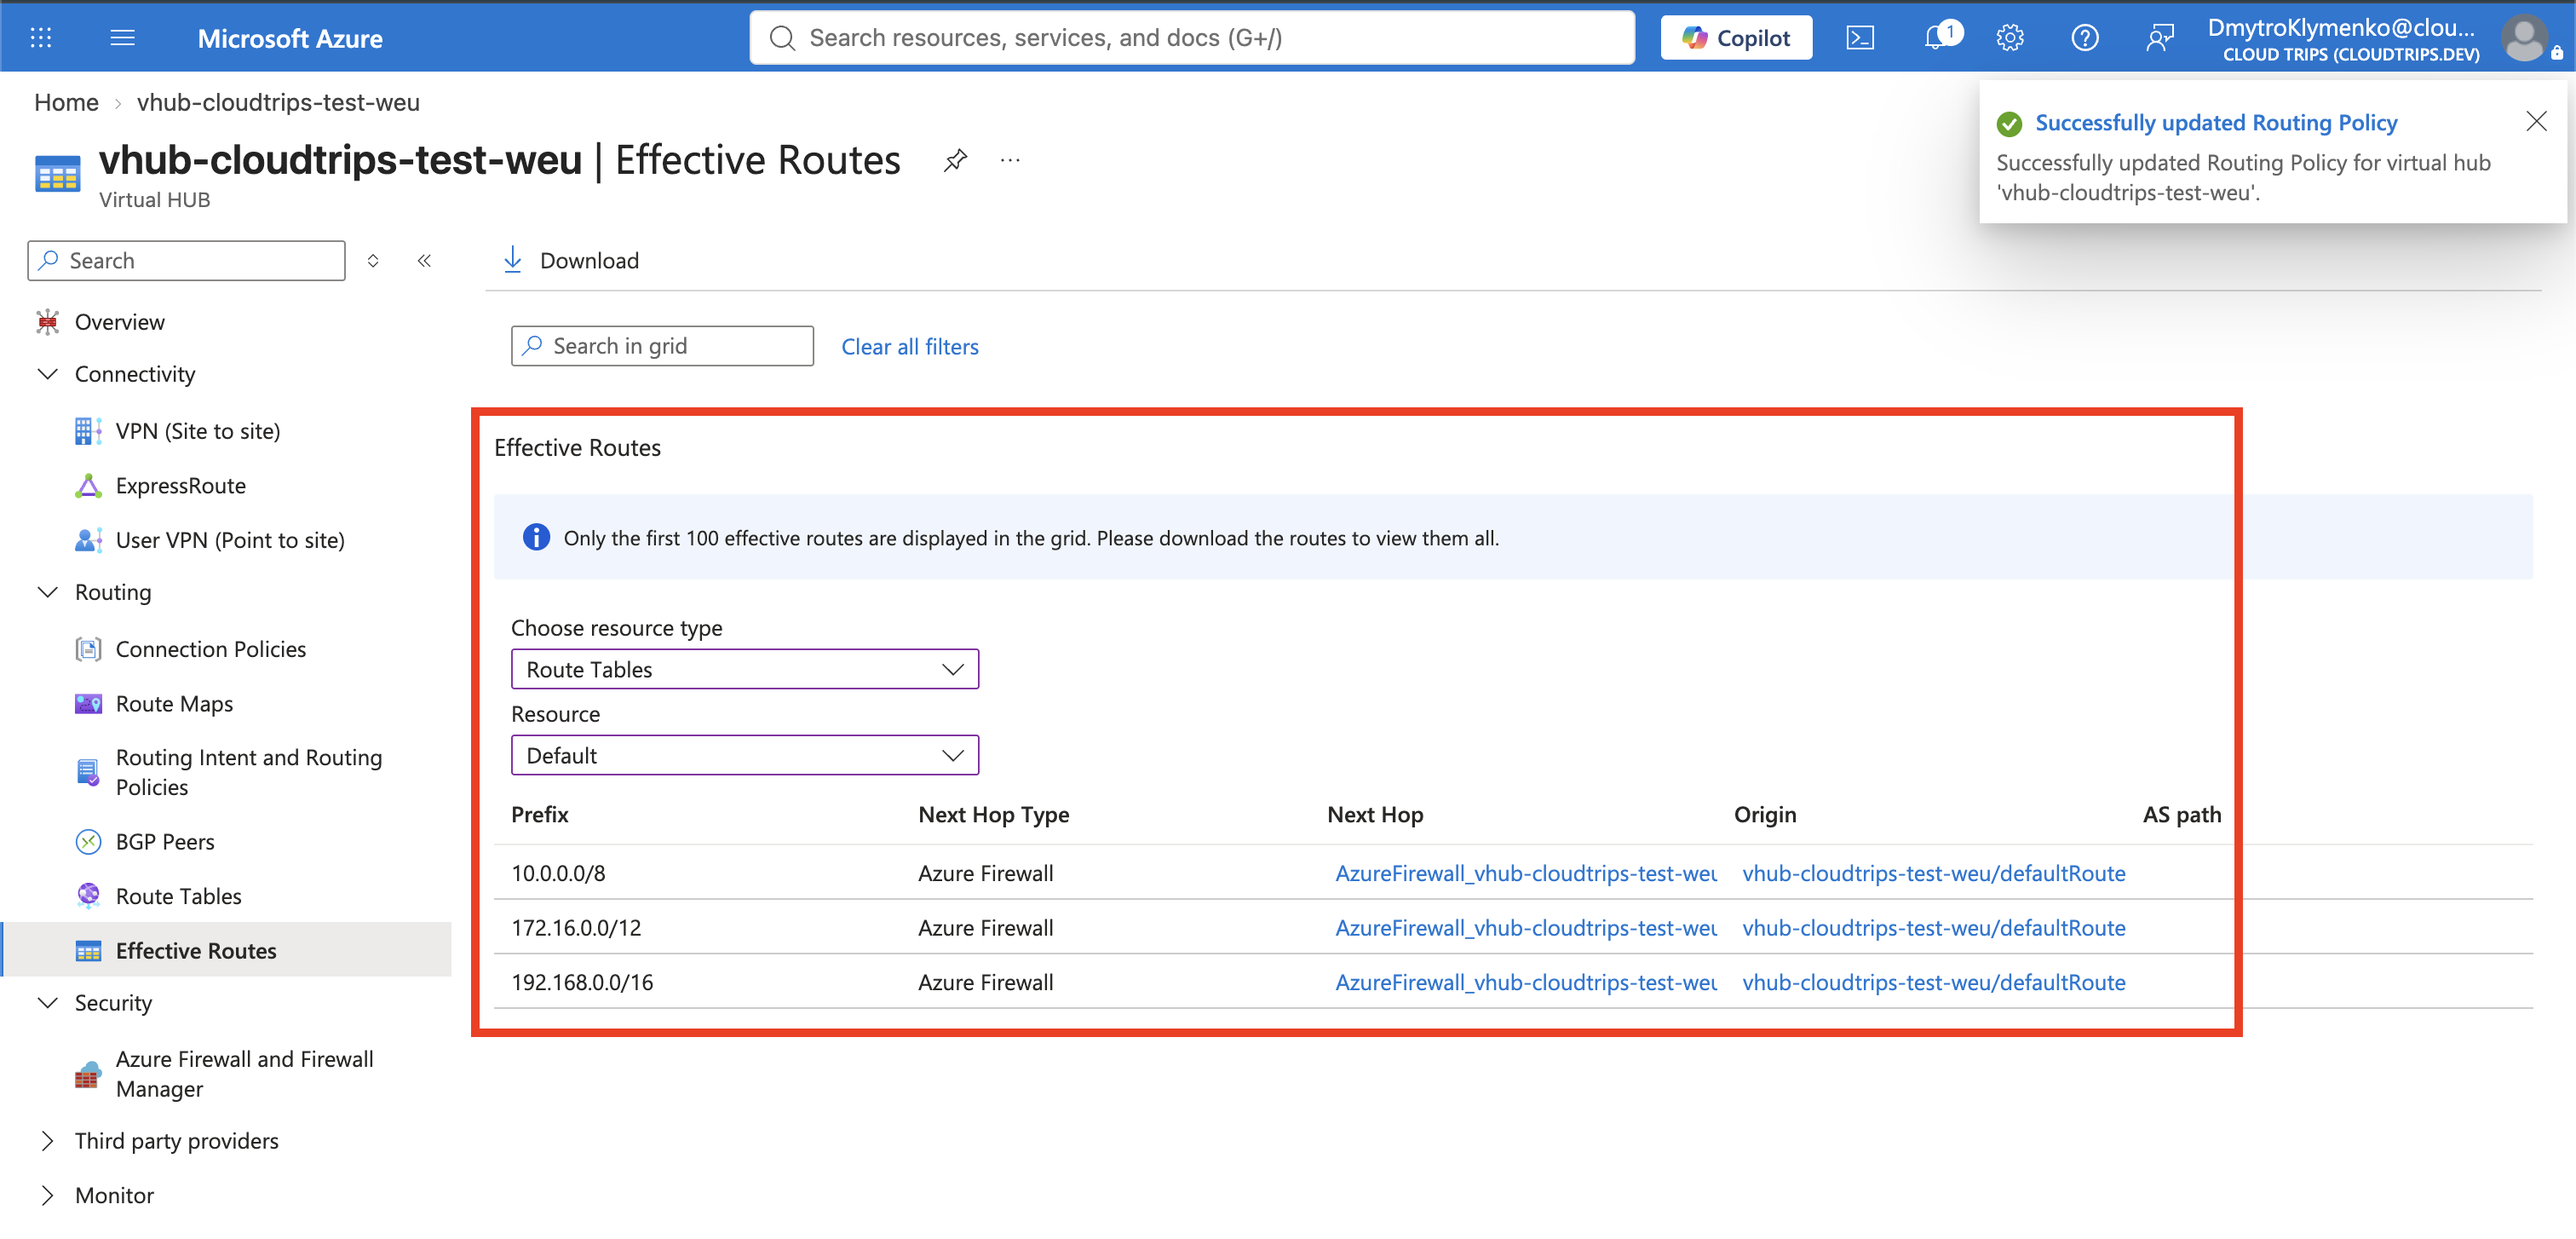
This is the important result: routing intent manages the VNet connections’ route associations and propagation, then programs Azure to send private traffic to the firewall. If the firewall policy allows a packet, Virtual WAN forwards it to the final VNet destination.
No VMs are required for this trip. The route-table result proves control-plane configuration, not end-to-end application connectivity.
Remove the Billable Lab
First return to Routing Intent and Routing Policies, remove the private traffic selection, and save. Wait until the policy has been removed before deleting its next hop.
Under Security, open Azure Firewall and Firewall Manager and delete the
Azure Firewall from the virtual hub. After the firewall is gone, delete
afwp-cloudtrips-vwan-test.
If the complete Virtual WAN lab is finished, delete both VNet connections,
then delete vhub-cloudtrips-test-weu and vwan-cloudtrips-test. Finally,
delete rg-cloudtrips-vwan-test-weu, which also removes the two temporary
VNets.