Workflows Need a Dedicated Hosting Environment? Create Logic Apps Standard
Logic Apps Standard gives your workflows a single-tenant runtime with provisioned compute. One Logic App resource can contain several workflows that share its hosting capacity and configuration. This suits a group of integrations that needs predictable capacity, private networking options, or more control over deployment.
| Consumption | Standard |
|---|---|
| One workflow per Logic App resource | Multiple workflows per Logic App resource |
| Shared, multi-tenant runtime | Single-tenant runtime on a hosting plan |
| Mainly pay per workflow operation | Pay for provisioned hosting capacity, plus applicable storage and connector usage |
| Convenient for occasional, simple workflows | Useful for integrations that need shared capacity and networking control |
Dedicated hosting here does not mean dedicated physical hardware or automatic private access. We will use a Workflow Service Plan, with a public endpoint for testing. An App Service Environment is not needed.
This lab creates HTTP request → Response in a new Standard app. You do not need the Consumption app from the previous trip. The hosting plan costs money even when no workflow runs. Review its estimate before creating it and delete the lab resources when finished.
Create the Standard Logic App
In the Azure portal, open Logic Apps → Add / Create. Select Standard → Workflow Service Plan (or Standard (Workflow Service Plan) if shown as one option).
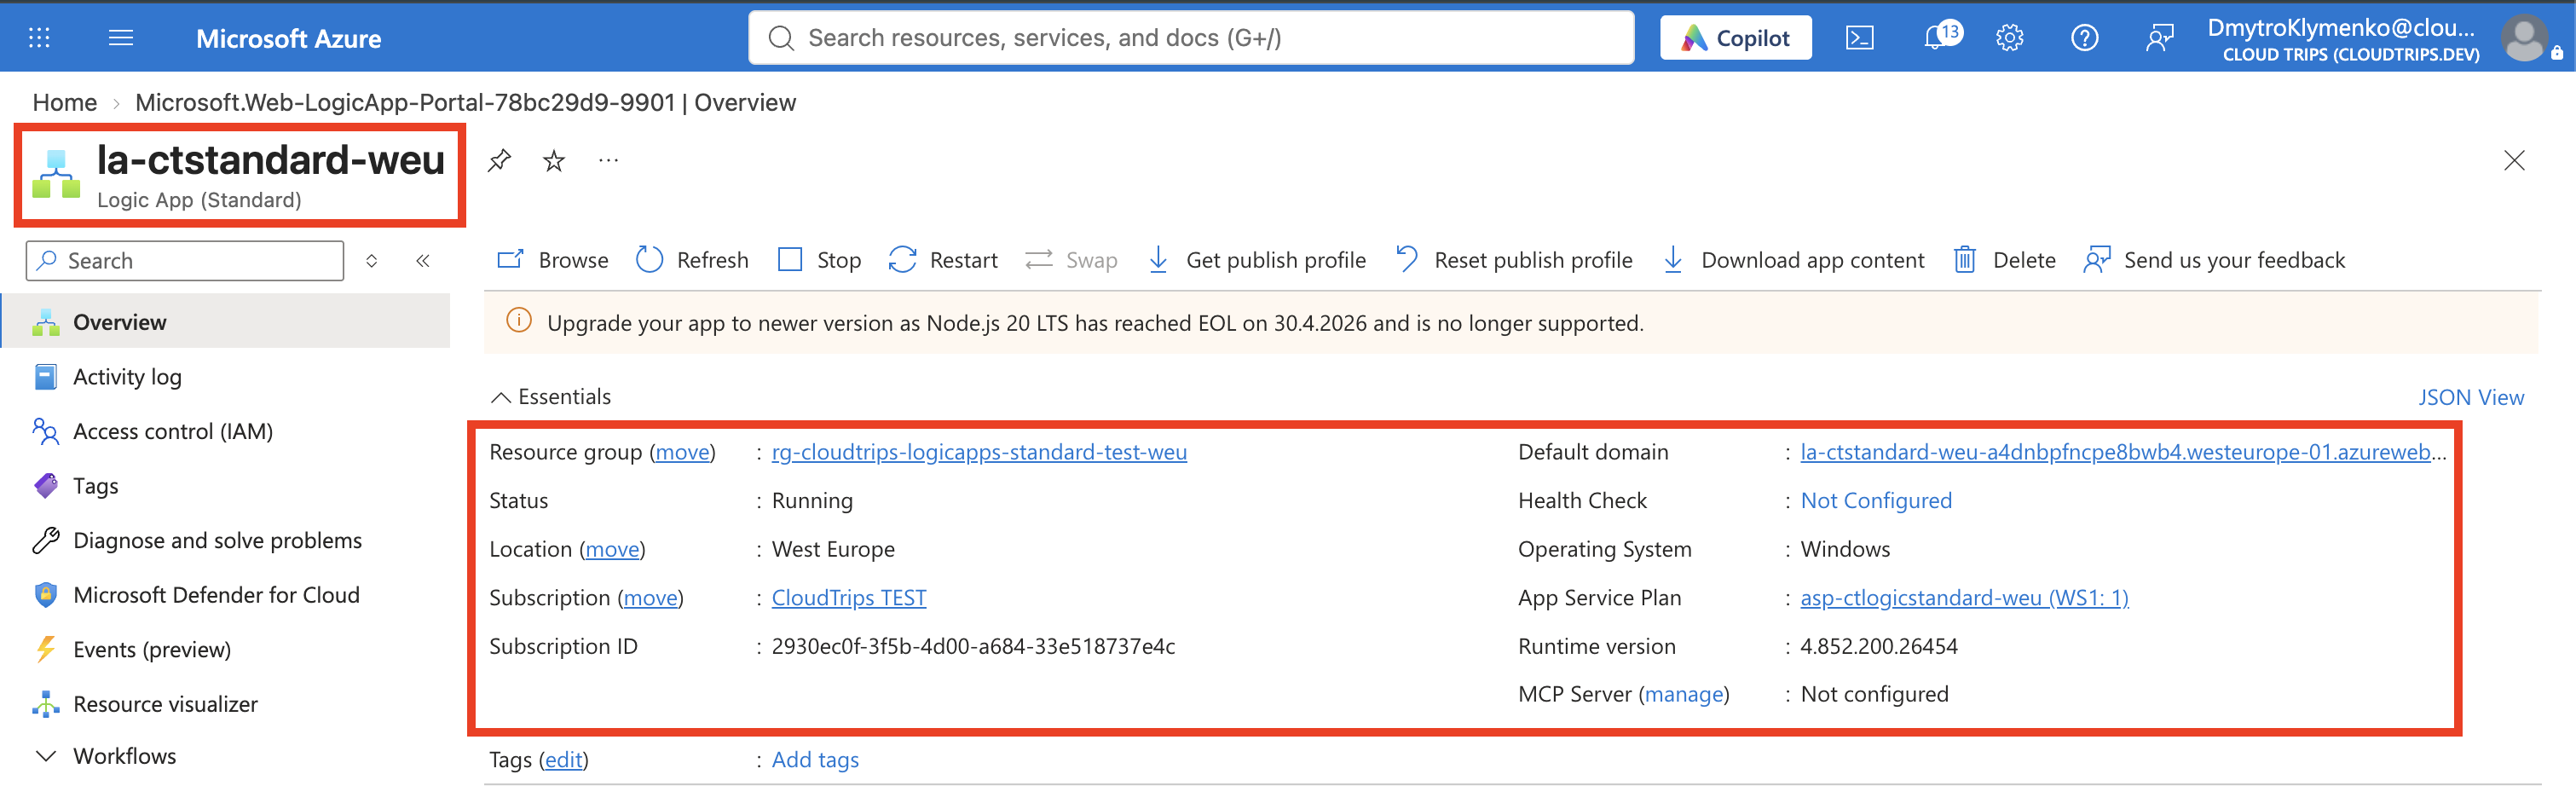
Subscription: CloudTrips TEST
Resource group: rg-cloudtrips-logicapps-standard-test-weu
Logic App name: la-ctstandard-weu
Region: West Europe
Hosting option: Workflow Service Plan
Plan: Create new → asp-ctlogicstandard-weu
Pricing tier: WS1
Use a unique suffix if the app name is unavailable. Keep the app and plan in the same region. Review the displayed price; WS1 is sufficient for this small lab.
On Storage, select Azure Storage and create a new account:
Storage account: stctlogicstdweu
Performance: Standard
Redundancy: LRS
The name must be globally unique. If creating the account separately, use general-purpose v2, leave hierarchical namespace disabled, and keep the default file-share security settings. This storage supports the workflow runtime and persistent state; it is not an order database that we build in this lab.
Keep public access enabled and virtual network integration/network injection disabled. Disable optional Application Insights for this lab. For host storage authentication, keep the connection-string/access-key option if offered. Do not disable storage account key access for this setup.
Select Review + create → Create. Wait for deployment to complete, then open the Logic App. Its Overview should identify the hosting plan. Creating the app provides the host; you still need to add a workflow.
Add a Stateful Workflow
In the app menu, open Workflows → Workflows → Add. Use:
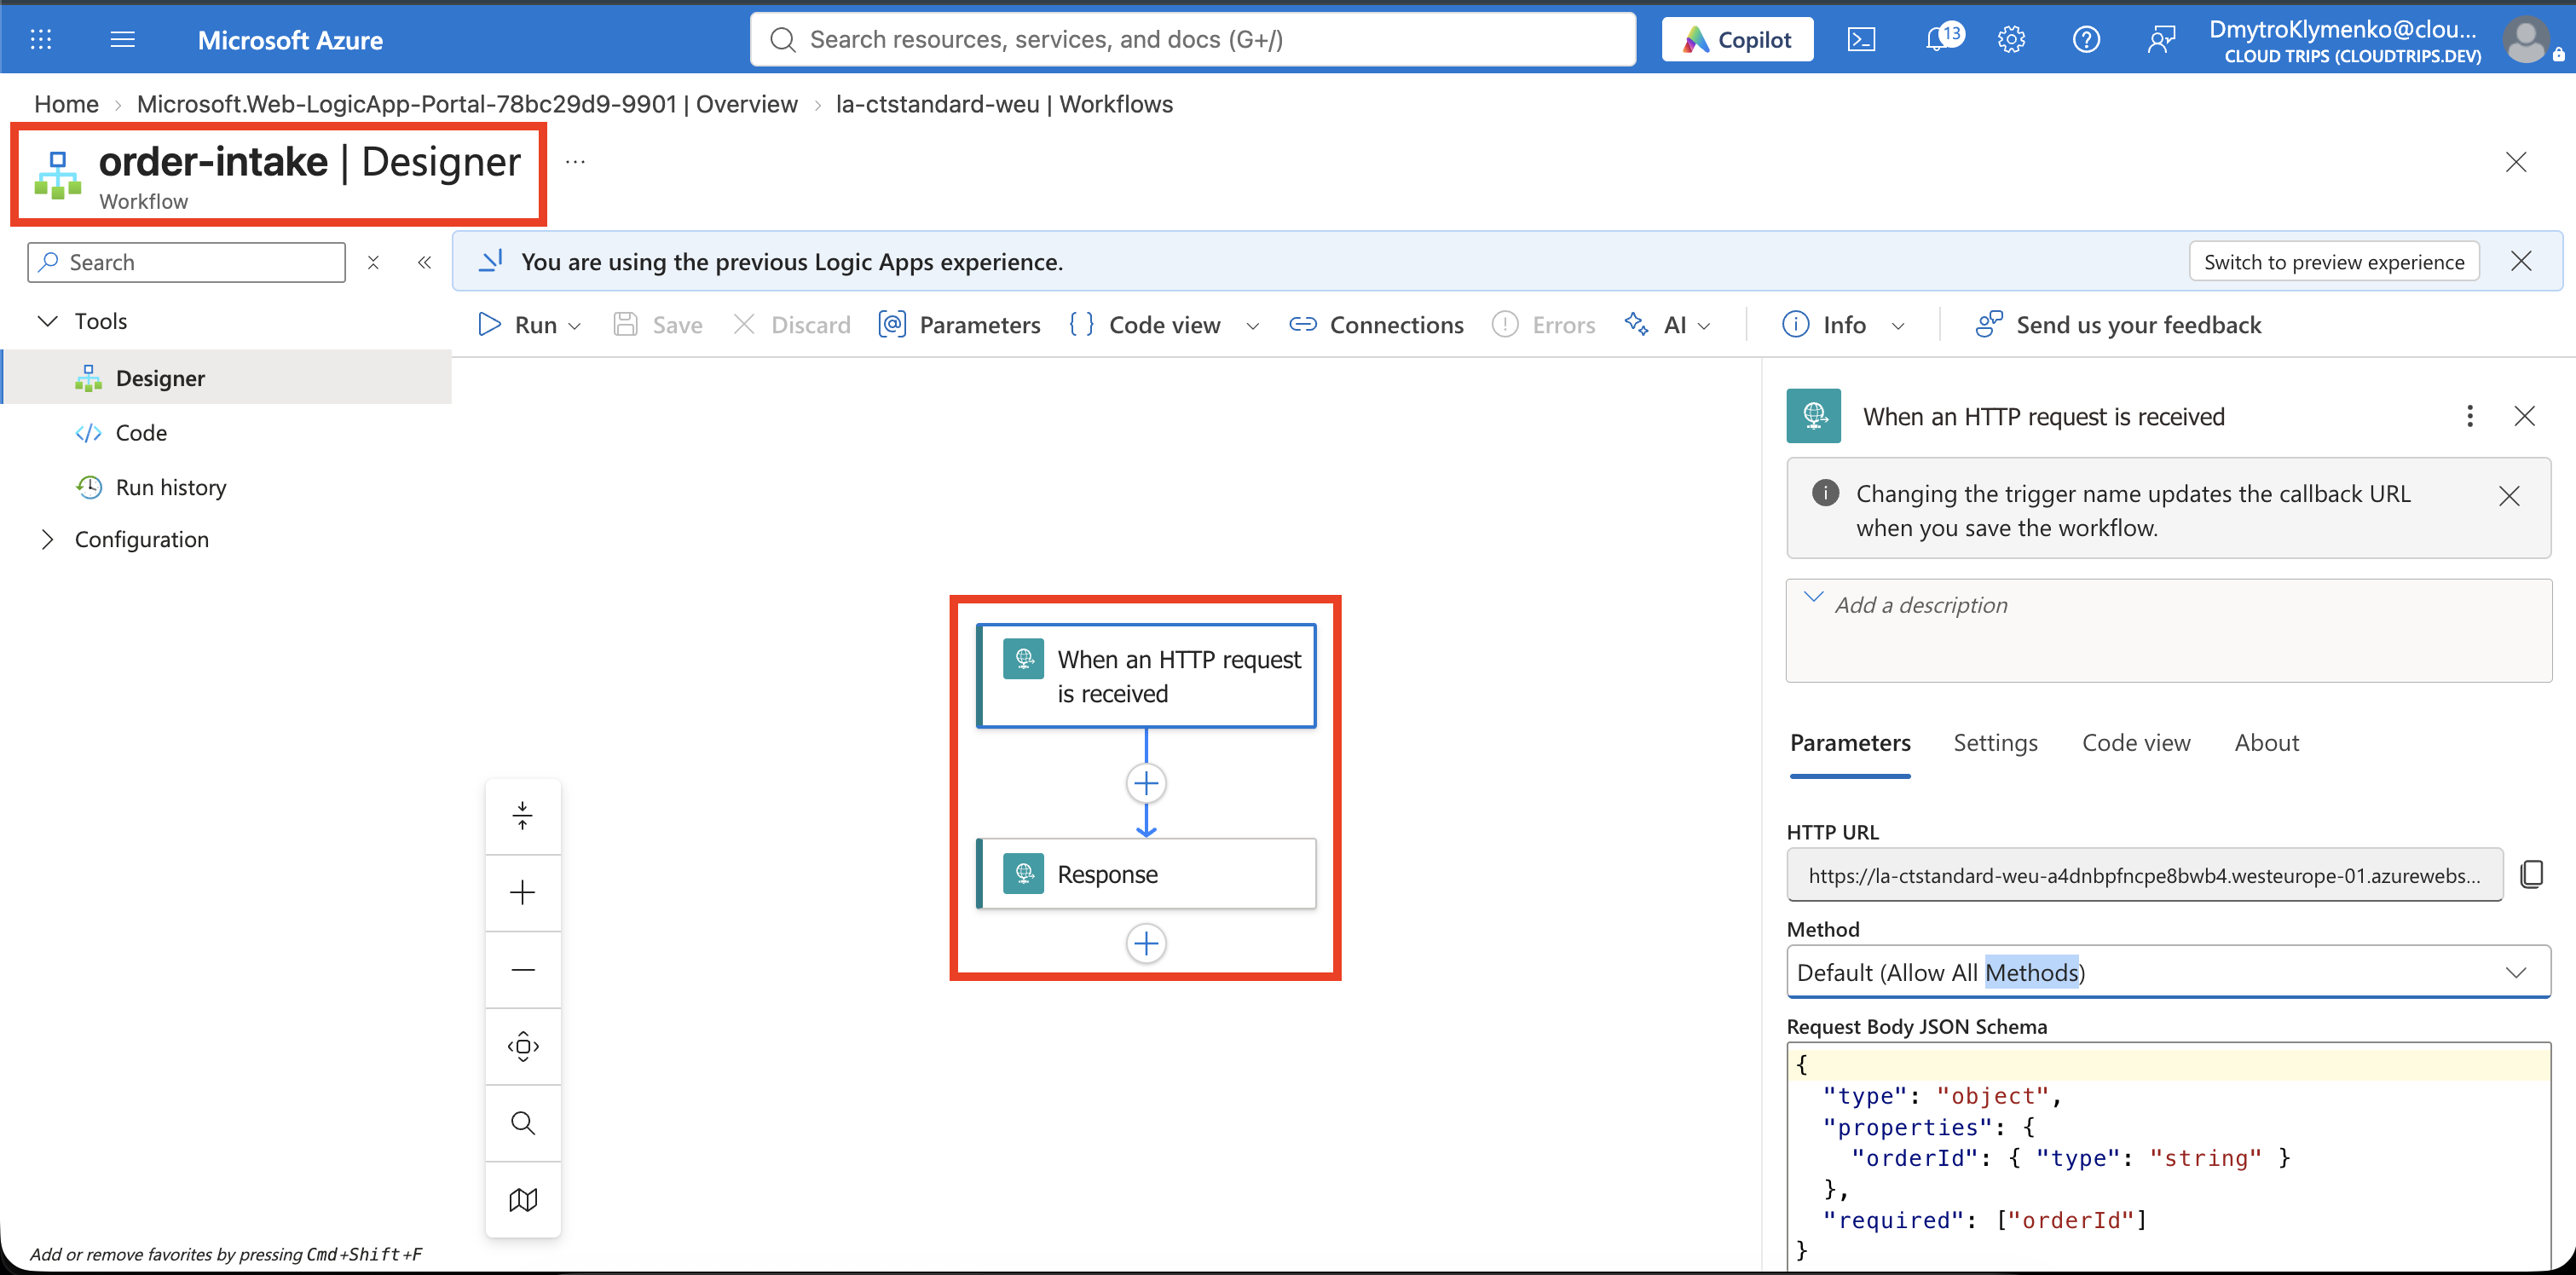
Workflow name: order-intake
State type: Stateful
Stateful persists execution state and provides run history, which makes this lab easy to inspect. Stateless is intended for short executions without durable workflow state; its run history is not enabled by default.
Create the workflow, select order-intake, and open Designer under Tools. Add the built-in Request → When an HTTP request is received trigger. Set Method: POST, using advanced parameters if necessary. Leave the relative path empty.
Paste this into Request Body JSON Schema:
{
  "type": "object",
  "properties": {
    "orderId": { "type": "string" }
  },
  "required": ["orderId"]
}
Below the trigger, select + → Add an action → Request → Response. Use:
Status Code: 200
Headers:
  Content-Type: application/json
Set Body to:
{
  "status": "received",
  "orderId": "@{triggerBody()?['orderId']}",
  "workflow": "order-intake"
}
The expression reads the order ID from the incoming request. Leave asynchronous response disabled. Save the workflow, reopen the trigger, and copy its generated HTTP POST URL / HTTP URL. This URL belongs to this workflow, not to every workflow in the app.
The URL contains an authorization signature. Keep it out of screenshots and collapse the trigger settings before capturing the designer.
Run the Workflow
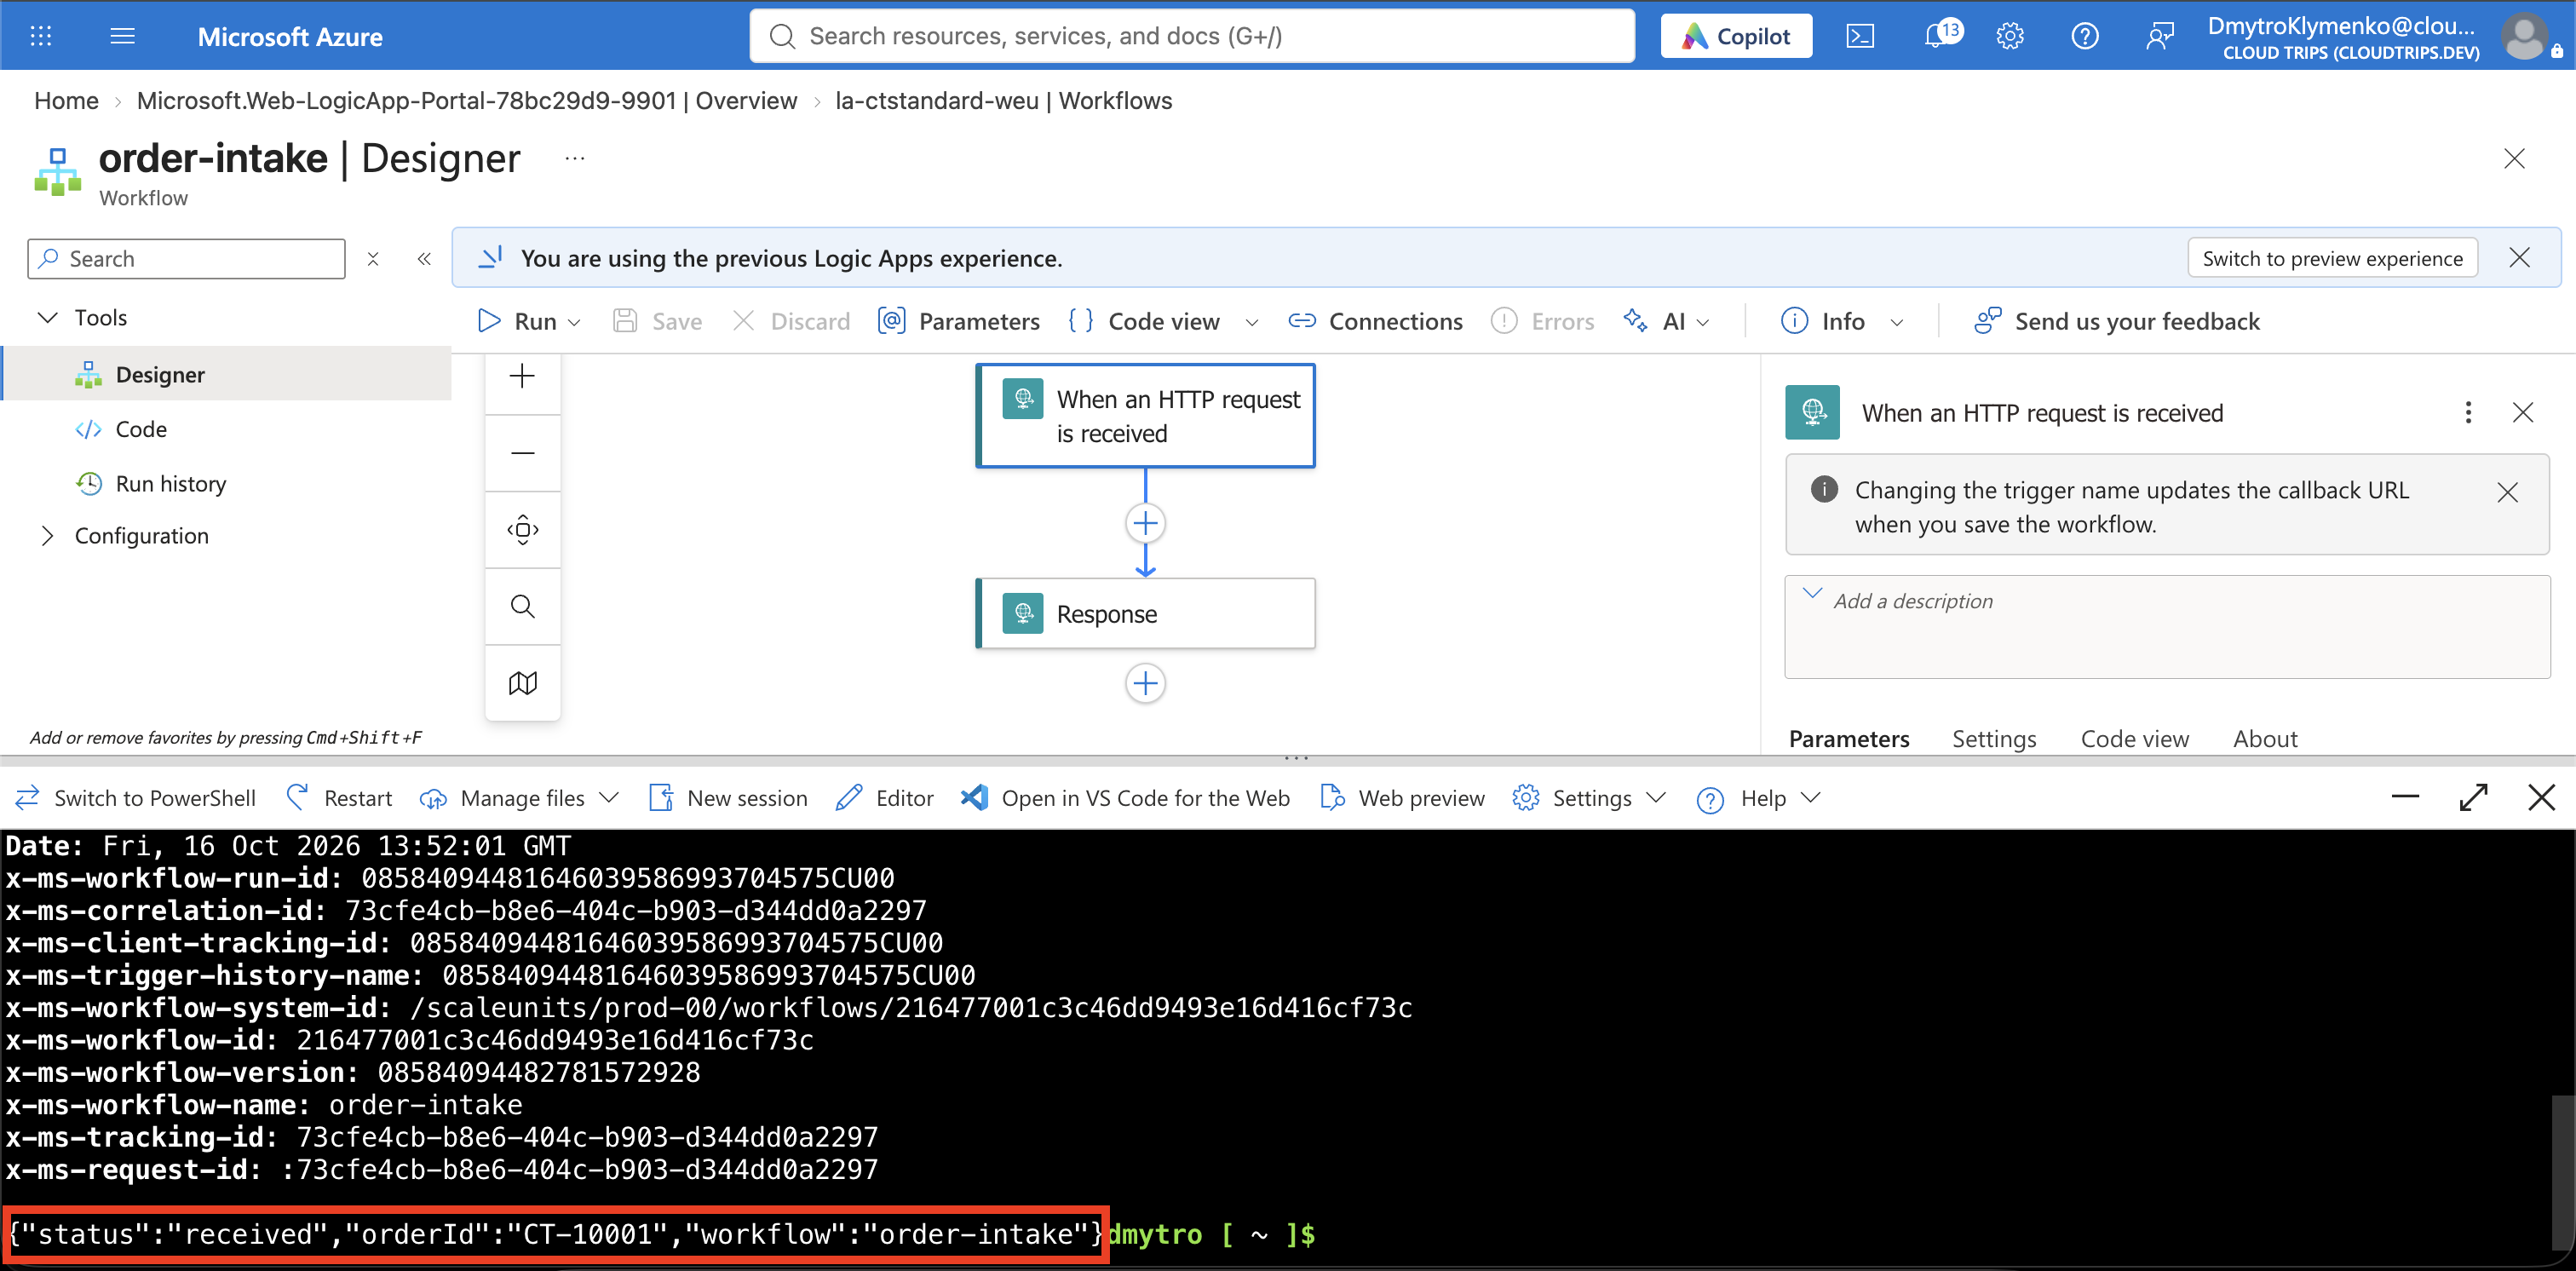
Open Azure Cloud Shell → Bash. Paste this block, then paste the full trigger URL at the hidden prompt:
read -r -s -p 'Paste the HTTP POST URL, then press Enter: ' ct_logic_url
printf '\n'

curl --include --max-time 30 \
  --request POST "$ct_logic_url" \
  --header 'Content-Type: application/json' \
  --data '{"orderId":"CT-10001"}'

unset ct_logic_url
Expect HTTP 200 and this body:
{
  "status": "received",
  "orderId": "CT-10001",
  "workflow": "order-intake"
}
This confirms that the workflow received the request and returned its order ID. It does not store or process an actual order.
Return to Workflows → Workflows → order-intake → Overview → Run history. Refresh, open the latest Succeeded run, and expand the trigger and Response action to compare their inputs and outputs. In Standard, run history belongs to each workflow; open the workflow rather than looking only at the app’s Overview.
If the call returns 401/403, copy the complete current trigger URL, including its query string. For 202 with no body, verify that the Response action is saved and asynchronous response is disabled. If the designer cannot load just after deployment, wait for host startup and refresh; persistent storage errors require checking the host storage account’s connectivity and authentication.
Finish
You now have a Standard host, its runtime storage, and one stateful workflow. You could add another workflow under the same app without creating another Logic App resource; it would share the app’s hosting capacity.
For cleanup, delete rg-cloudtrips-logicapps-standard-test-weu, including its hosting plan and storage account. Stopping the app or deleting only the workflow does not remove the plan’s ongoing cost. Keep the resource group only if you intend to continue using this paid hosting environment.