VM Needs Extra Storage? Add a Data Disk
The CloudTrips Linux VM needs additional persistent storage for application data. Increasing the VM size can provide more CPU and memory, but it does not increase the capacity of its managed OS disk. Attach a separate Azure managed data disk instead.
Azure manages the disk resource and attaches it to the VM. Linux must still identify the new block device, create a partition and filesystem, mount it, and persist that mount across reboots.
This trip adds one empty 32-GiB Standard SSD to the existing Ubuntu VM. The
disk is formatted as ext4 and mounted at /datadrive by filesystem UUID. The
trip finishes with an optional safe removal procedure.
Separate the Storage Types
An Azure VM can use several kinds of storage:
| Storage | Persistent? | Intended use |
|---|---|---|
| OS disk | Yes | Linux, installed packages, and system configuration |
| Managed data disk | Yes | Application files and data that must survive VM restarts or moves |
| Temporary disk | No | Disposable cache or scratch data only |
Do not place important data on the temporary disk. It can be erased during resizing, deallocation, host maintenance, or host failure.
Confirm the Prerequisite VM
This trip expects:
Subscription: CloudTrips TEST
Resource group: rg-cloudtrips-compute-test-weu
Virtual machine: vm-cloudtrips-linux01-test-weu
Operating system: Ubuntu Server
VM state: Running
If the VM does not exist, complete Need a Linux Server Quickly? Create a Linux VM first. The resize trip is useful but not required.
Connect through SSH:
ssh \
  -i ~/.ssh/sshkey-cloudtrips-linux-test-weu.pem \
  azureuser@<VM-PUBLIC-IP>
Record the existing block devices before attaching anything:
lsblk -o NAME,SIZE,TYPE,FSTYPE,MOUNTPOINTSTake note of the OS disk and any temporary disk. This baseline prevents you from formatting the wrong device later. Exit the session:
exitPlan the Managed Disk
Use:
Disk name: disk-cloudtrips-linux01-data-test-weu
Source type: None (empty disk)
Storage type: Standard SSD LRS
Size: 32 GiB
LUN: 0
Host caching: None
The logical unit number, or LUN, identifies the attached data disk to
the VM. LUN 0 is the first data-disk position; it is unrelated to the Linux
device name. Linux might expose the disk as a SCSI device such as /dev/sdc or
as an NVMe device, depending on the VM series and storage controller.
What Are SCSI and NVMe?
SCSI and NVMe are two interfaces through which a VM can communicate with a disk. SCSI is the traditional, widely supported interface. NVMe is a newer interface designed for high-performance storage. They do not describe what is stored on the disk or which filesystem it uses; they determine how Linux sees the device.
| Disk interface | Example Linux disk name | Example partition name |
|---|---|---|
| SCSI | /dev/sdc |
/dev/sdc1 |
| NVMe | /dev/nvme0n2 |
/dev/nvme0n2p1 |
The name is assigned by Linux and can differ from these examples. Use lsblk
to identify the newly attached empty disk instead of assuming its name.
Standard SSD keeps this exercise relatively inexpensive. Disk charges continue while the managed disk exists, even if the VM is stopped.
Create and Attach the Disk
Open vm-cloudtrips-linux01-test-weu in the Azure portal and go to:
Settings > DisksUnder Data disks, select Create and attach a new disk.
Configure the new row:
Name: disk-cloudtrips-linux01-data-test-weu
Storage type: Standard SSD LRS
Size: 32 GiB
LUN: 0
Host caching: None
Select Apply or Save, depending on the portal view. Wait until the operation completes and the disk appears as attached.
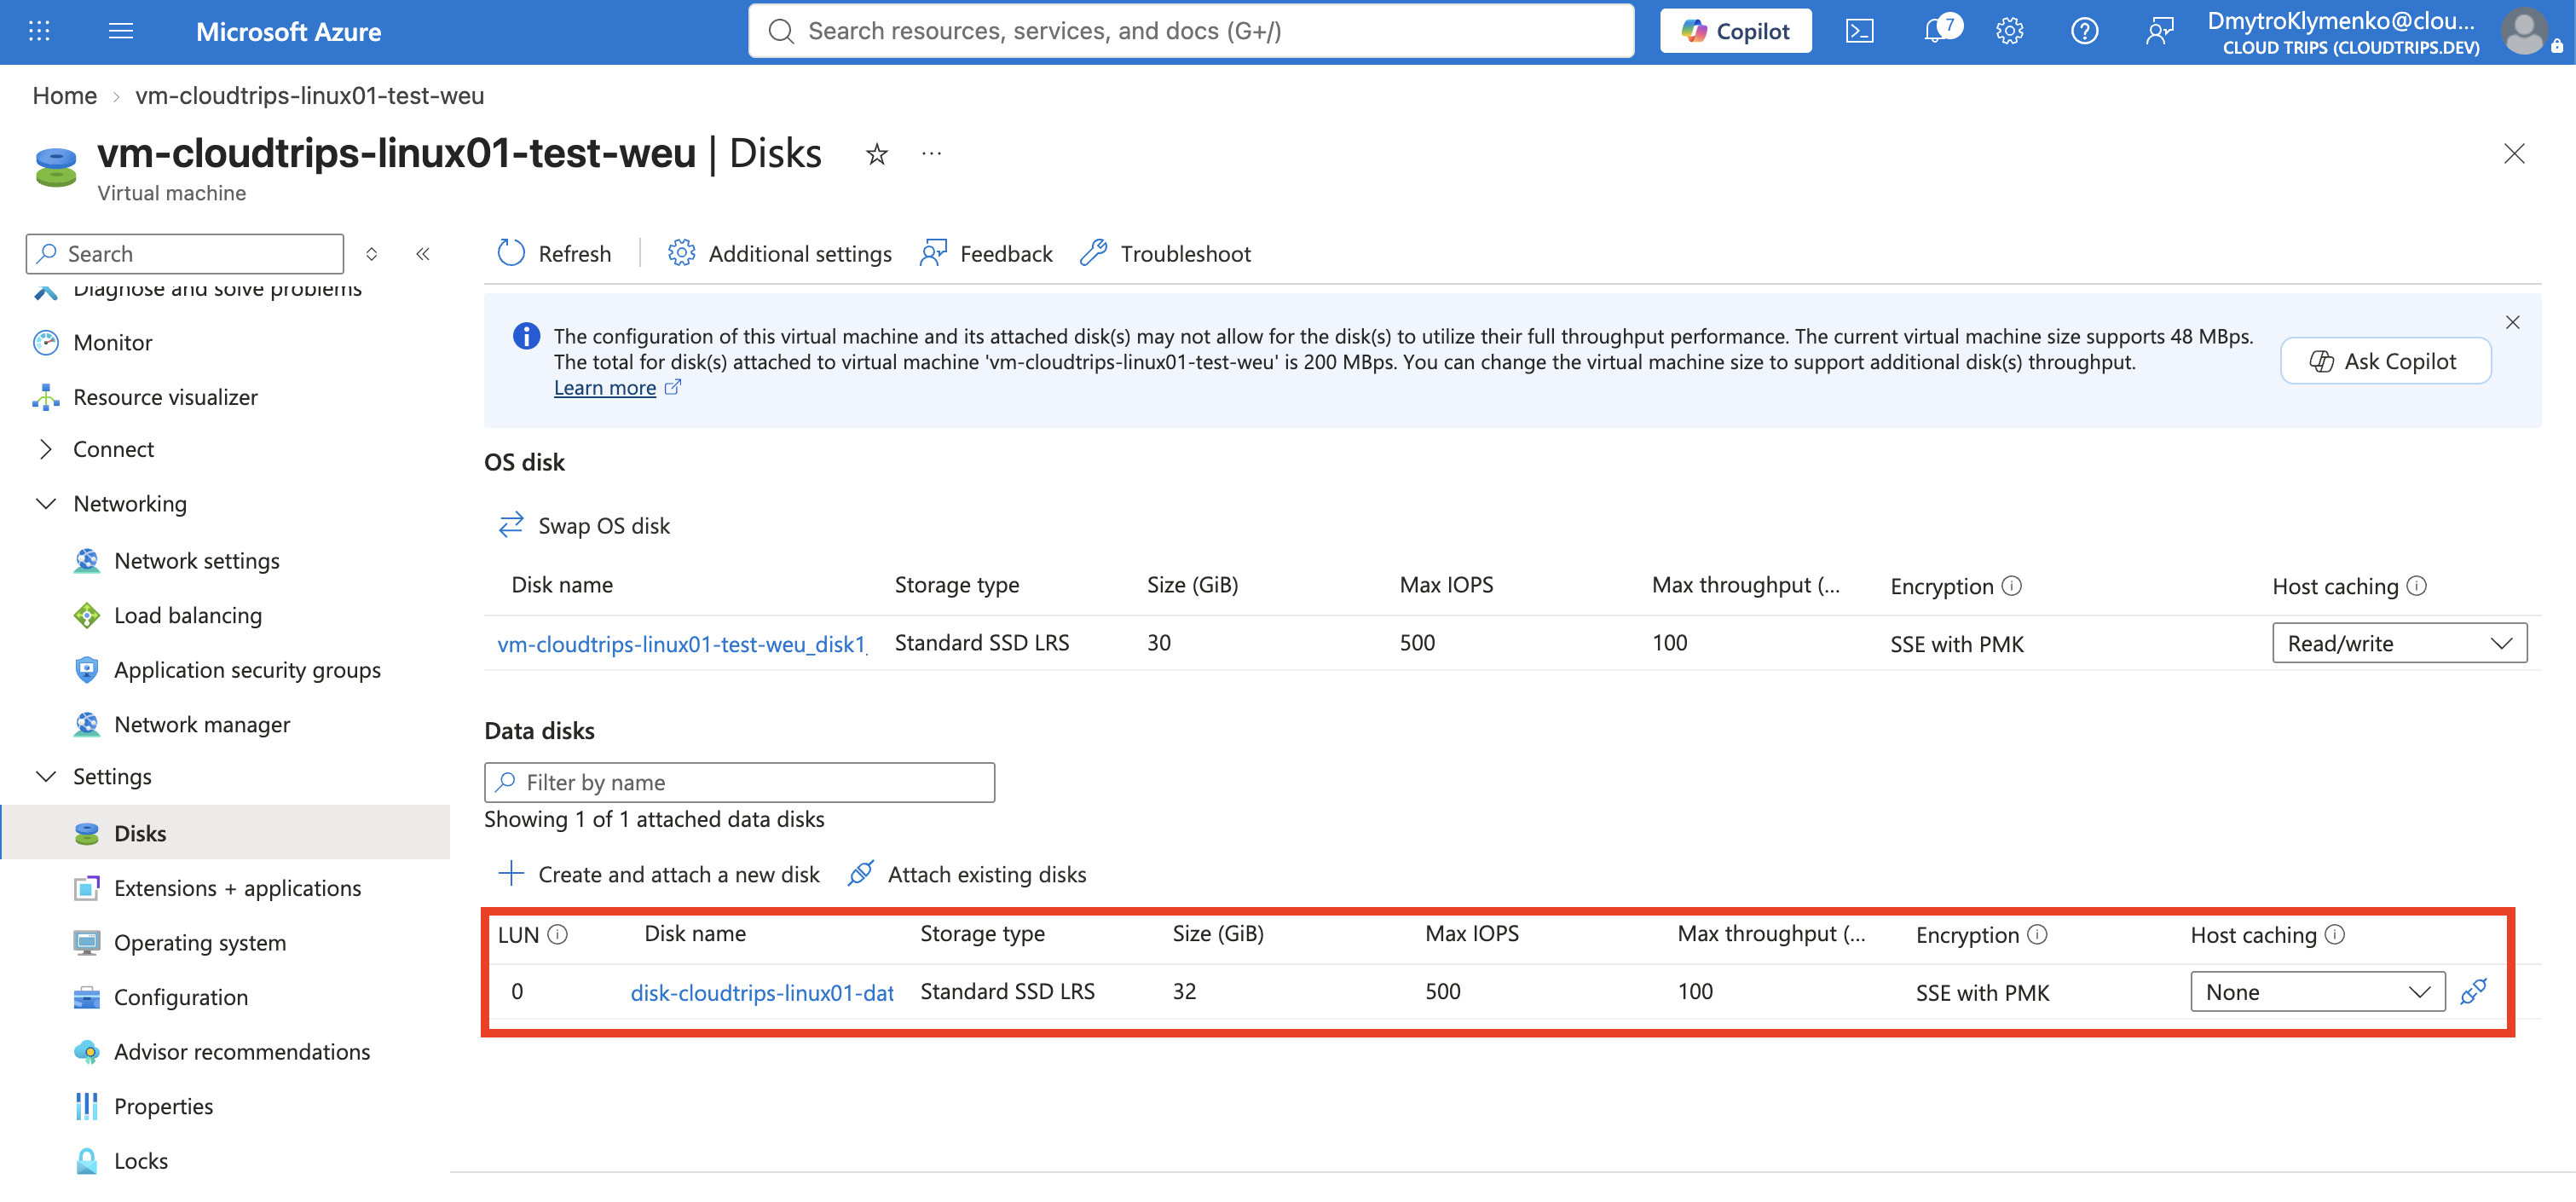
Attaching an empty disk does not immediately create a usable Linux directory. The remaining steps happen inside Ubuntu.
Identify the New Device Safely
Reconnect with SSH and run:
lsblk -o NAME,SIZE,TYPE,FSTYPE,MOUNTPOINTSCompare the output with the baseline. Find the new approximately 32-GiB disk
that has no filesystem and no mount point. On this VM it will commonly be
/dev/sdc, but it might have another SCSI or NVMe name.
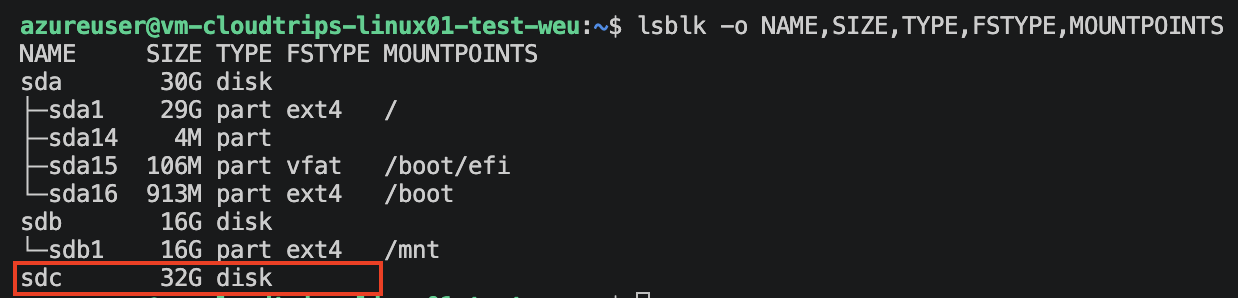
Before formatting, verify the candidate explicitly. Replace /dev/sdc only if
your output shows a different new device:
sudo fdisk -l /dev/sdc
lsblk -f /dev/sdc
Stop if the device contains the / filesystem, an existing filesystem, or
data you did not expect. The following formatting commands destroy existing
data on the selected device.
Partition and Format the Empty Disk
The new Azure disk is currently only an empty block-storage device. Linux can
detect /dev/sdc, but it cannot store normal files on it yet. Prepare it in
three layers:
Azure disk       /dev/sdc
    ↓ partition
Partition        /dev/sdc1
    ↓ filesystem
ext4 filesystem
    ↓ mount
Linux directory  /datadrive
The partition defines which area of the disk will be used. A disk can be
divided into several partitions, but this VM needs only one storage area, so
/dev/sdc1 will cover almost the complete 32-GiB disk. A filesystem could be
placed directly on some unpartitioned Linux disks, but using a GPT partition
table and a partition provides a conventional layout that disk-management
tools understand clearly.
The filesystem organizes the partition into files and directories. A raw partition does not yet understand filenames, folders, ownership, permissions, or free space. This trip uses ext4, a common Linux filesystem.
The filesystem must then be mounted to connect it to the Linux directory
tree. Linux does not normally assign data disks drive letters such as D:.
Mounting /dev/sdc1 at /datadrive means that a file written to
/datadrive/cloudtrips.txt is physically stored on this Azure data disk.
After confirming that /dev/sdc is the new empty disk, create a GPT partition
table and one partition covering the disk:
sudo apt-get update
sudo apt-get install -y parted
sudo parted /dev/sdc --script mklabel gpt
sudo parted /dev/sdc --script mkpart primary ext4 0% 100%
sudo partprobe /dev/sdc
Verify that /dev/sdc1 now exists:
lsblk /dev/sdcCreate an ext4 filesystem:
sudo mkfs.ext4 -L cloudtrips-data /dev/sdc1If your disk appeared with another name, use that device and its resulting
partition throughout this section. Do not blindly copy /dev/sdc from the
example.
Mount the Filesystem
Create the mount point and mount the new filesystem:
sudo mkdir -p /datadrive
sudo mount /dev/sdc1 /datadrive
Verify it:
findmnt /datadrive
df -h /datadrive
Create a small test file:
echo "CloudTrips persistent data disk" | sudo tee /datadrive/cloudtrips.txt
sudo cat /datadrive/cloudtrips.txt
This manual mount lasts only until the next reboot unless it is also declared
in /etc/fstab.
Persist the Mount by UUID
Device names such as /dev/sdc1 can change after a reboot. Use the filesystem
UUID, which identifies the filesystem itself:
sudo blkid /dev/sdc1Back up /etc/fstab before editing it:
sudo cp /etc/fstab /etc/fstab.cloudtrips-backupCapture the UUID and append the mount definition:
DISK_UUID=$(sudo blkid -s UUID -o value /dev/sdc1)
echo "UUID=${DISK_UUID} /datadrive ext4 defaults,nofail 0 2" | sudo tee -a /etc/fstab
nofail lets Linux continue booting if the data disk is temporarily
unavailable. An incorrect /etc/fstab entry can still cause boot or mount
problems, so verify it before rebooting:
sudo findmnt --verify --verbose
sudo umount /datadrive
sudo mount -a
findmnt /datadrive
sudo cat /datadrive/cloudtrips.txt
Do not reboot until findmnt --verify completes without an error related to
/datadrive and mount -a remounts the disk successfully.
Verify Persistence After Reboot
Reboot Ubuntu:
sudo rebootThe SSH connection closes. Wait for the VM to become reachable, reconnect, and run:
findmnt /datadrive
df -h /datadrive
sudo cat /datadrive/cloudtrips.txt
lsblk -o NAME,SIZE,FSTYPE,MOUNTPOINTS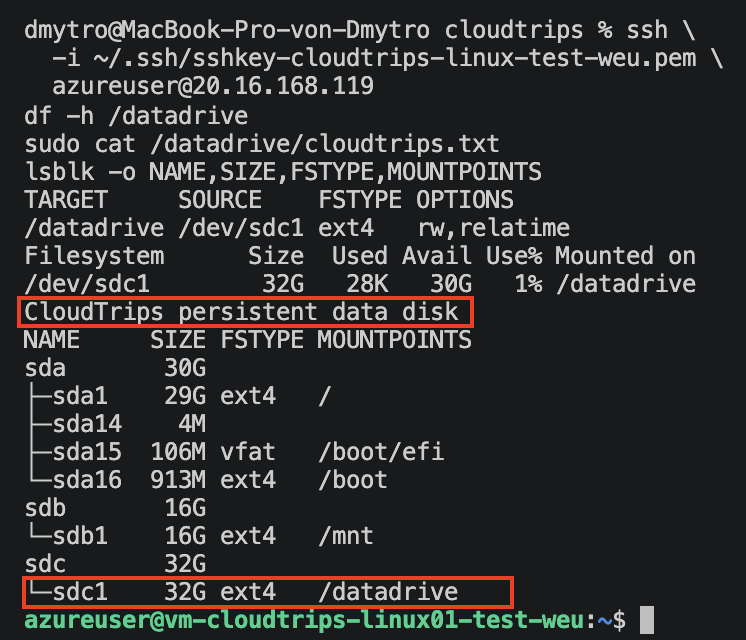
Confirm that /datadrive is mounted from the new ext4 filesystem and the test
file still contains CloudTrips persistent data disk.
In the Azure portal, open the managed disk and confirm:
Name: disk-cloudtrips-linux01-data-test-weu
Disk state: Attached
Owner: vm-cloudtrips-linux01-test-weu
Size: 32 GiB
Storage type: Standard SSD LRS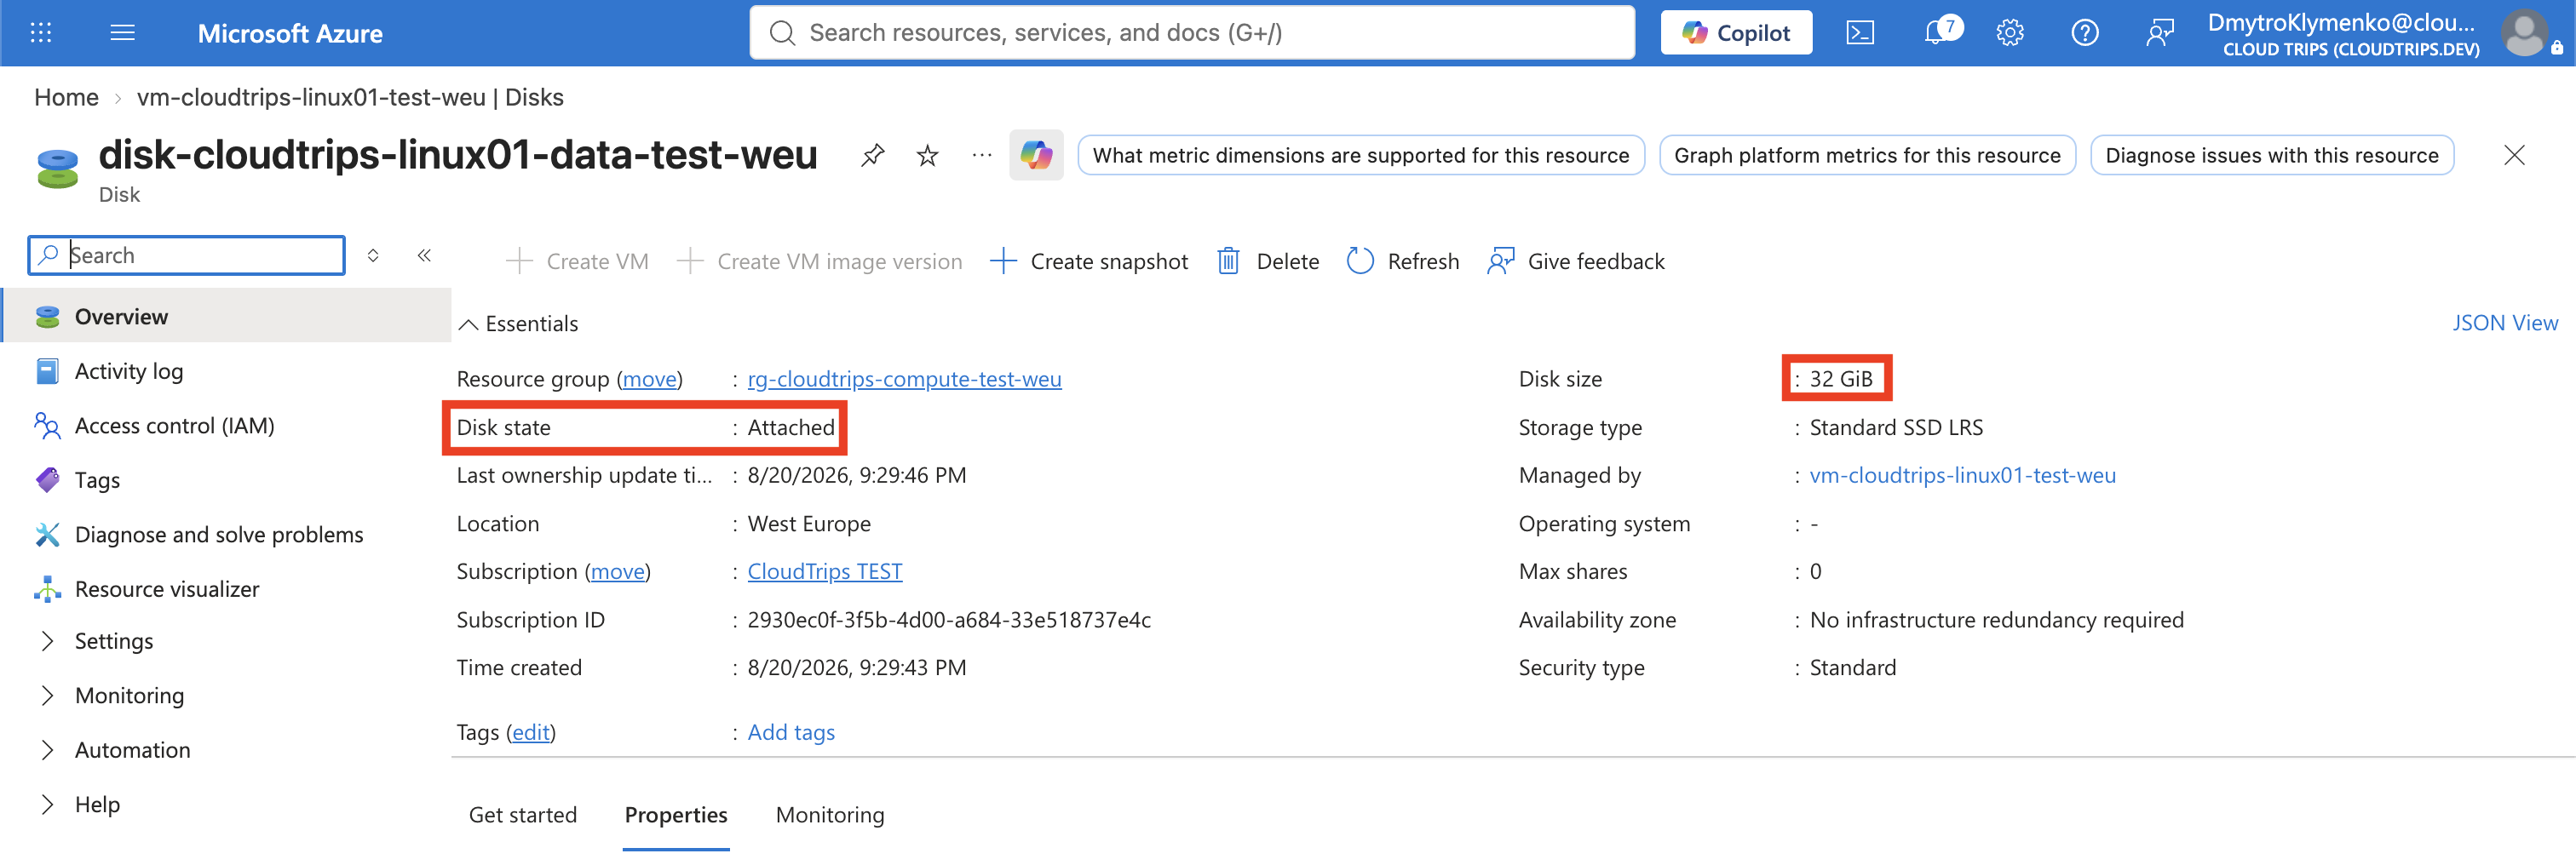
The VM now has persistent application storage independent of its OS disk.
Keep or Remove the Data Disk
Keep the disk if you want to continue testing storage. It continues to incur managed-disk charges while it exists.
To remove it safely, first reconnect to Linux. Back up any required data, then
remove the /datadrive line from /etc/fstab before detaching the disk:
sudo cp /etc/fstab /etc/fstab.before-disk-removal
sudo sed -i '\| /datadrive ext4 |d' /etc/fstab
sudo findmnt --verify --verbose
sudo umount /datadrive
Confirm that it is no longer mounted:
findmnt /datadrive || echo "/datadrive is not mounted"Then open VM > Settings > Disks, detach
disk-cloudtrips-linux01-data-test-weu, and select Apply. Detaching removes
the disk from the VM but does not delete the managed disk or stop its charges.
After confirming that the disk state is Unattached and its data is no longer needed, open the disk resource and select Delete.
Keep vm-cloudtrips-linux01-test-weu and the shared
rg-cloudtrips-compute-test-weu resource group. Do not delete the group because
it can also contain the Windows VM and its resources.